Use the Work list
Note
The Pulse Scheduling Experience is only available on the Skedulo Pulse Platform.Overview
The scheduling actions enable users to dispatch, lock, unlock, allocate, unschedule, or duplicate work items directly from the Work list. A scheduling action can be applied to one or more work items at a time.
To access the scheduling actions, select one or more work items from the list. The available actions are displayed above the list.
Note
Some of the functionality described in this documentation requires that users have specific permissions for managing work and resource records.The context panel
The context panel enables you to quickly view and edit details about a work item without navigating away from the Work list. It also gives you access to scheduling actions that can be applied to the work item that you are viewing.
For more information about using the context panel, see Use the context panel.
What scheduling actions are available on the Work list?
The scheduling actions available to a user are determined by their role and permissions. The following table lists the core actions that are available from the Work list and the Context panel to a user with the Scheduler role. For more detailed information about each action, see below.
| Action | Description |
|---|---|
| Dispatch | A notification of the work is sent to the allocated resource. This can only be done if the work item as the status Pending Dispatch, and has an allocated resource with a notification protocol set for their user. Note: A single work item can have multiple resources allocated to it, and this can cause mixed notification results. |
| Deallocate | Remove all resource allocations from the work and return its status to Pending Allocation. |
| Cancel | Changes the work status to Cancelled. This can only be done if a work item is not cancelled, complete, or locked. |
| Lock | Makes it impossible to update any of the work data. A lock icon will appear on the work list and on the work details page when there is an attempt to edit a field. |
| Unlock | Unlocks the work item so that information on it can be changed. Only locked items can be unlocked. |
| Unschedule | Removes the date and time from the work, and changes the status to Queued. |
| Duplicate | Create a direct copy of one or more work items, with the option to modify certain details. See the Duplicate work documentation for more information. |
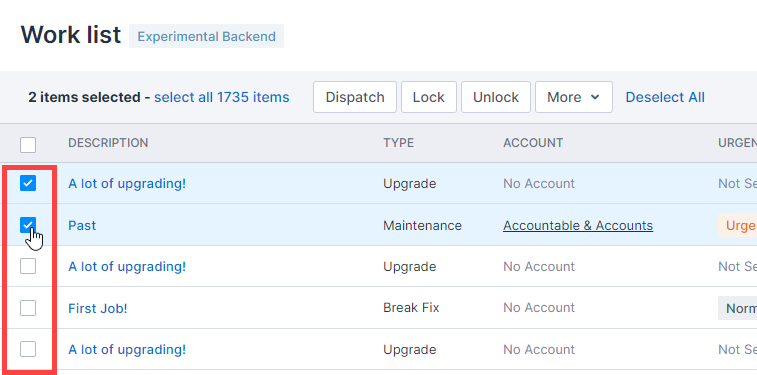
Select work items
Select one or more work items to expose the Scheduling actions available to you at the top of the Work list.
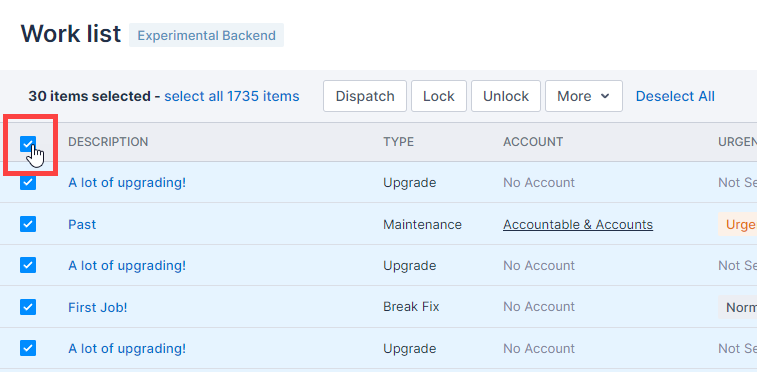
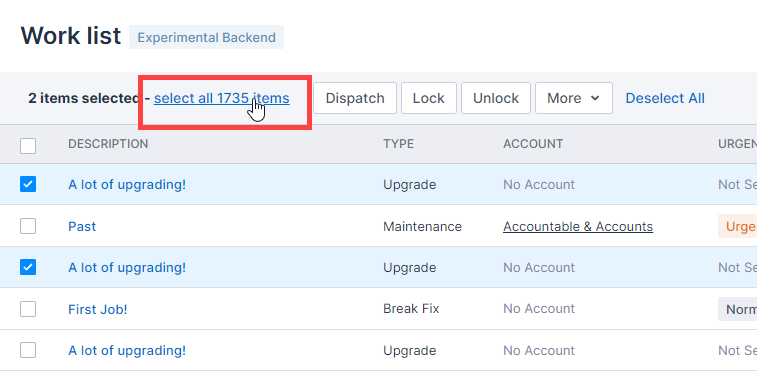
To select work items, use one of the following methods:
- Click a check box beside a work item to select items one by one. Work items remain selected if you navigate to other pages of the Work list.
- Click the check box on the list header to select all visible pages in the list. For example, if you are viewing 30 records on a page, it will select all 30. Items remain selected if you navigate to other pages in the Work list.
- With one or more work items selected, click select all [number] items on the Work list header to select all pages associated with your tenant. This includes pages that are not visible on the current page.
Dispatch, Deallocate, and Unschedule work
The work flow through dispatching, deallocating, or unscheduling work items is the same. The following sections describe the process for dispatching work, but the same process applies to the other actions.
Perform an action on a single work item
Scheduling actions can be used on single work items from the Work list and the context panel.
For example, to dispatch a single work item:
-
Select the work item you want to dispatch.
-
Click Dispatch.
The following outcomes are possible:
- The action is successful
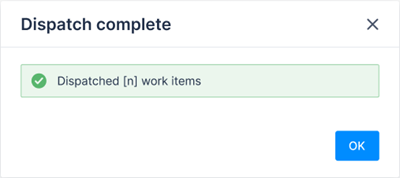
If the work item meets the requirements for the action and there are no problems with the allocated resource/s, the action is successfully performed and the Dispatch complete modal is displayed.
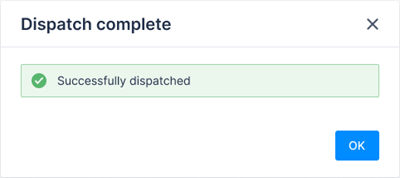
Click OK to dismiss the modal. The worklist refreshes and the status of the work item changes to Ready.
-
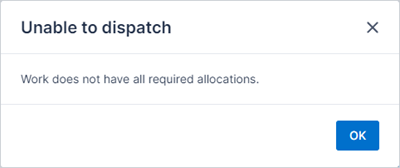
The action is unsuccessful
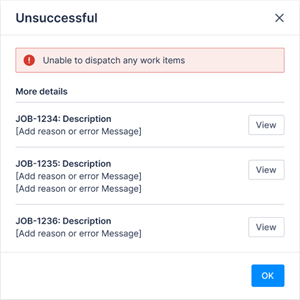
If the work item doesn’t meet the requirements for the action, the Unable to dispatch modal is displayed. The reason for the failure is detailed on the modal. After you dismiss the modal, the work list refreshes and the status of the work item remains unchanged.
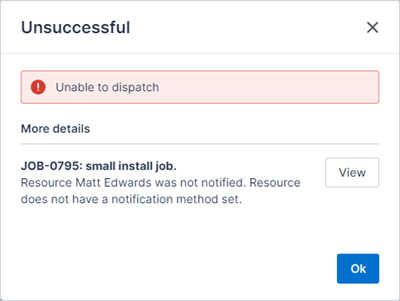
If the work item meets the requirements for the action, but there is an issue with the allocated resource/s, the Unsuccessful modal is displayed. Click View to open the work item’s details page in a new window. After you dismiss the modal, the work list refreshes and the status of the work item status remains unchanged.
-
The action is partially successful
If a work item has more than one resource allocated, then you can trigger a partial success, which is where the work item meets the requirements for the action, but one or more of the allocated resources do not.
For example, when dispatching an item, one or more resources might not be logged on and therefore be unable to receive the notification. In this case, a warning is displayed on the Dispatch complete modal.
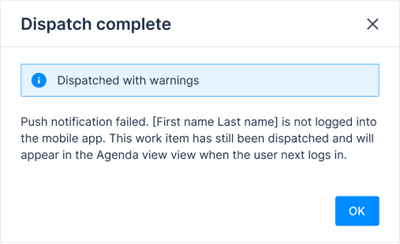
Click View to open the work item’s details page in a new window. After you dismiss the modal, the work list refreshes and the status of the work item is updated.
Perform an action on multiple work items at a time
Perform actions on multiple items at a time using the Work list.
For example, to dispatch multiple items:
-
In the Worklist, use the checkboxes to select all work items you want to dispatch.
-
At the top of the work list, click Dispatch.
The following outcomes are possible:
-
The action is successful
The requirements for the action and the selected action is successfully performed on all selected work items. Click OK to dismiss the dialog.
-
The action is unsuccessful
The requirements are met, but the action is unsuccessfully performed on all selected work items. Each work item is listed on the modal with the reason for its failure. Click a View button to open that item’s work details page in a new window.
-
There is a mixed result
If one or more of the selected items does not meet the requirements for the action, then a modal is displayed asking you to confirm your selection. The number of items that meet the requirements for the action is displayed in brackets on the Continue button.
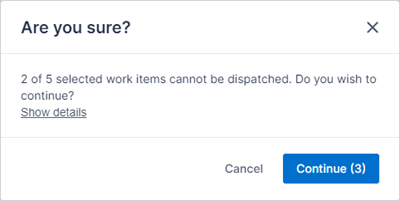
The following options are available:
- Cancel. Close the dialog and return to the Work list.
- Continue (n). Perform the action on the work items that meet the requirements for the action.
- Show details. Expand a list of the work items that didn’t meet the requirements for the action.
- View. Open an item’s work details page in a new window.
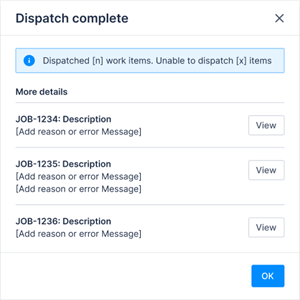
If all of the selected items meet the requirements for the action, but one or more of the allocated resources for an item fail, then a warning is displayed on the Dispatch complete modal.
For more information, see the Dispatch work and Deallocate and unschedule articles.
Cancel work
The route through the Cancel action is similar to the Dispatch, Unschedule, and Deallocate actions, except that after checking if the requirements are met and before the action is performed, you are prompted to provide a cancellation reason.
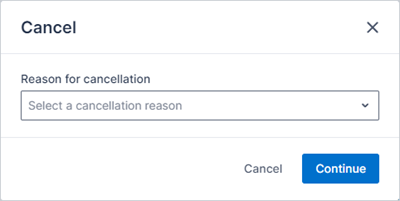
Select a cancellation reason from the drop-down list, and then click Continue to proceed. If the action is successful, the work list refreshes and the status of the work item changes to Cancelled. If you cancel multiple work items at a time, the cancellation reason you select is applied to all items.
For more information about cancelling work in the Skedulo web app, see Cancel or reschedule work.
Lock and unlock work
The Lock action makes it impossible to update any of the work data.
To lock a work item from the work list:
-
Click the checkbox beside the work item you want to lock. The scheduling actions are displayed above the list.
-
Click Lock.
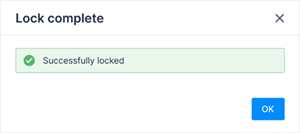
-
If the action is successful, the Lock complete modal is displayed. Click OK to dismiss the modal. The work list refreshes and the status of the work item changes to Locked.
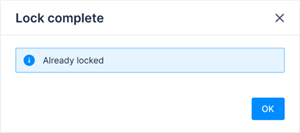
-
If the selected work item was already selected, the Lock complete modal is displayed with a warning. Click OK to dismiss the modal. The work list refreshes and the status of the work item remains unchanged.
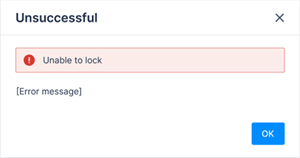
-
If the action is unsuccessful, the Unsuccessful modal is displayed with a warning. Click OK to dismiss the modal. The work list refreshes and the status of the work item remains unchanged.
-
If you have more than one item selected and one or more work items cannot be locked, the failing work items are listed on the modal with the reason for the failure.
For example, if you try to lock four work items and one of them is already locked, the following modal is displayed:
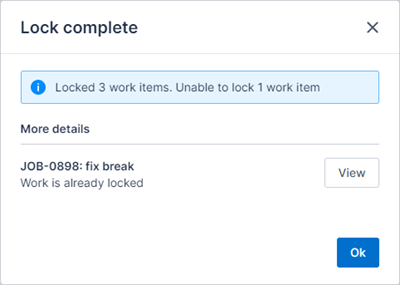
Click View to open the work item’s details page in a new window. Click OK to dismiss the modal.
The workflow for the Unlock action is the same. For this action to be successful, the work item must already be locked.
Duplicate work
The Duplicate action enables you to creat a direct copy of one or more work items. This option is available from the Work list and the Context panel.
See the Duplicate work documentation for details on how to do this.
Scheduling actions and recurring work items
When you perform actions on work items that are part of a recurring job, you are given the option to apply the action to the current work item only, or to all work items in the series. Select which option you want and then click Continue to proceed.

For more information about using scheduling actions, see Scheduling actions.
Feedback
Was this page helpful?