Access availability console

Overview

When scheduling jobs for resources it is essential to know when they might be available or unavailable to perform that work. Availability management within Skedulo allows resources to define when they are available and unavailable. This can be defined using a standard “availability template” (a rolling period of standard availability, e.g., Monday to Friday 9:00 am to 5:00 pm). You can also specify global or regional holidays. Additionally, resources can create unavailability from their mobile using the Skedulo mobile app. These availability settings all work together to produce a comprehensive availability management function.

The availability console is where schedulers are presented with a single availability request table–for all their resources. This enables the scheduler to approve or decline requests in one place without having to perform additional navigation steps to access the individual’s request.

Access the Availability console

Access the Availability console via the navigation menu at the top of the console. Two options are provided:

  1. Calendar.
  2. Requests.

Availability calendar

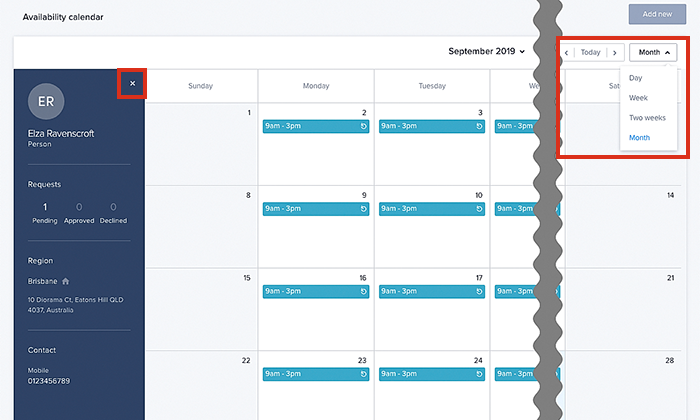
The availability calendar provides a scheduler with a view of all their resources’ availability, unavailability, and requests, per day, week or fortnight. There’s a control at the top-right of the console, allowing you to switch between each calendar view.

When viewing a single day in the timeline, it is also possible to overlay allocated jobs and activities (in the form of job cards), this way it is easy for a scheduler to assess a resource’s availability before they grant approval. There are checkboxes to enable the option to “show jobs” (or overlay them) and “show activities” above the action bar at the top-right of the calendar.

Dates on the calendar marked with a small dot are public holidays observed by your organization. Roll over the small dot to display the name of the holiday.

Each block in the calendar contains information about the resource’s availability or unavailability. Clicking on one of these colored labels or blocks exposes more information about that request:

  • The type of request (e.g., unavailability).
  • The request’s status (e.g., approved).
  • The request’s start and end date (and time).

Dark aqua blue labels reflect a resource’s general availability (i.e., typically their working hours, say 9 to 5).

Gray labels (marked U) indicate periods of resource unavailability (where light gray text on a white background indicates pending approval or declined, white text on dark gray background indicates approved).

The availability calendar demonstrating several pending and approved types of availability requests.

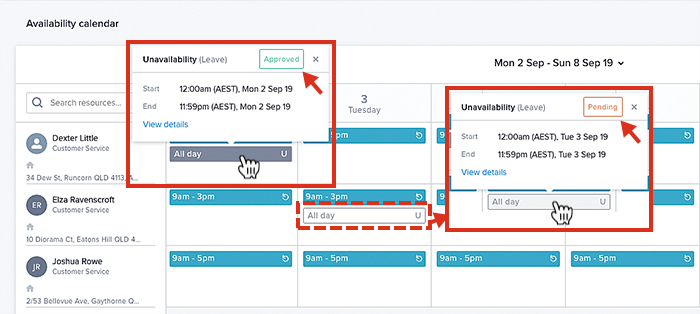
Clear labels with an aqua blue border reflect periods of availability. Aqua blue text on a white background indicates pending approval or declined, aqua blue text on a pale aqua blue background indicates an approved request.

Where a request spans several days, clicking on one request label will highlight all the associated labels.

To take a look at an individual’s availability, click on a resource’s name–this will take you to a filtered view of that person. To close out and return to the main calendar, click on the small x button (at the top-right of the individual’s profile panel).

An individual’s availability for a month. Note the location of the small exit button above the user’s profile panel.

Another way to view availability is to perform a comma-separated search. You can search for first names, last names, or a mixture of the two. To search for multiple resources, separate each name using a comma (e.g., “Dexter, Rowe”). The search box is located above the resource list. To clear the search, click on the small x to the right of any search text.

Availability templates

Availability templates allow schedulers to adjust a single resource’s availability, or apply the same availability times to multiple resources in one go.

To access an availability template, in the availability calendar select the Day view of the swimlane (from the time-span dropdown menu). Clicking on an availability template (the aqua blue blocks) will bring up the Availability Template modal.

How to access an availability template from within the availability calendar.

Create new availability templates

To create availability templates and add resources from scratch, click the Add new button at the top-right of the Availability console. Once clicked it opens up the Availability Template modal in create mode. The modal has navigation buttons to help you through the creation process.

A new blank availability template, ready to tailor to your needs.

Within the modal, there are two tabs: Template details and Resources. The template name, dates, days, and times can be changed in the template details. Once the details are complete, click on the Next button to toggle over to the Resources tab.

How to adjust the template details for a resource.

The resources tab allows the scheduler to see which resources are assigned to a template. Uncheck the box marked Only show selected to add multiple resources to the template. Remember to save any changes made. Use the same process to remove resources from a template.

How to view and change resources on an availability template.

Availability patterns

Overview

Availability patterns provide a more dynamic and flexible way to create recurring patterns of availability for your resources.

Patterns can recur on a weekly basis or as a custom pattern that recurs over a custom period up to 28 days. You can also set the duration that the availability pattern is applied to the resource’s schedule, which can be particularly useful for contractors or seasonal employees.

When enabled, availability patterns replace availability templates. You can use either availability patterns or availability templates, but not a combination of both.

Using availability patterns instead of shifts to create asymmetric patterns of availability reduces the burden on schedulers, as Skedulo’s Suggest and Optimize features can be used with availability patterns to create valid schedules.

Weekly or custom recurring availability patterns

Weekly availability patterns recur the same pattern of availability Monday to Sunday for their selected resources. You can also define how often you want to repeat that weekly pattern based on the number of weeks in your rotating schedule, up to once every four weeks.

For example, you can set two weekly patterns, one that runs from Monday to Friday and another that runs from Monday to Thursday and have them recur alternate weeks to give a resource every second Friday off.

Custom availability patterns provide a way of creating asymmetric patterns of availability. For example, your organization may require an eight day rotating roster of four days on and four days off.

Custom patterns can be set to repeat based on the number of days in your rotating schedule.

Enabling availability patterns

When enabled, availability patterns supersedes availability templates. Organizations can use templates or patterns, but not a combination of both.

This means that for Skedulo and Skedulo for Salesforce organizations that enable availability patterns, availability templates will be ignored.

You have the following options when deciding to change from availability templates to availability patterns:

  • Before you enable availability patterns, speak to your Skedulo Customer Success Manager to co-ordinate a data migration from availability templates to patterns.
  • After enabling availability patterns, you can manually re-create your records as patterns.

If you want to revert back to availability templates, your availability patterns will be turned off and your previously saved availability templates will be re-applied.

Assigning resources to an availability pattern

You can assign one or multiple resources to an availability pattern, and also assign a resource multiple availability patterns.

To assign a resource to an availability pattern, you must select the date from which you want the pattern to apply to the resource’s availability.

For weekly patterns, this means that resources who are assigned the pattern mid-week will show availability from the day of the week that aligns with their start date. For example, if a resource starts on a Wednesday, their availability will only show for Wednesday to Sunday of that week.

For custom availability patterns, Day 1 of the pattern will apply from the resource’s start day. For example, in a “four days on / four days off” availability pattern, a start date of Wednesday, April 3rd will be the first day of the pattern, with the resource showing as available from Wednesday to Saturday then unavailable from Sunday to Wednesday.

Setting an end date for the pattern ends the resource’s availability in relation to that pattern on the specified date.

Creating a weekly availability pattern

Availability patterns replace availability templates when availability patterns are enabled for your Skedulo organization.

You can create an availability pattern the same way you create availability templates through the Skedulo Web Application availability console.

Availability patterns differ from availability templates in that they can recur either weekly or in a custom recurring pattern.

Patterns that recur weekly have the same format as availability templates, and use the same pattern every seven days from Monday to Sunday.

Prerequisite

You must have availability patterns enabled for your organization. To have this feature enabled, speak to your Skedulo Customer Success contact.

  1. In the Skedulo Web Application, click Availability > Calendar.

  2. Click Add new in the upper-right corner, then select Availability template.

  3. The Availability template modal for Availability Patterns includes two tabs: Pattern and Resource.

  4. In the Availability Template modal, select the Weekly pattern type, then the availability for each day you want your resource/s to be available. availability template modal with pattern tab selected

  5. Select the weekly recurrence you want to apply to the weekly pattern. Select as frequently as weekly up to once every four weeks. set repeating pattern interval When you have finished setting up your weekly availability pattern, click Next to proceed to the Resources tab.

  6. In the Resources tab, you can select the resources that will be assigned the availability pattern. You can select as many resources as you want from multiple regions. Selected resources appear in the list on the right, where you can set the dates from which you want the availability pattern to be applied to each resource. select resources for the availability template

  7. Select the period of time for which you want the availability pattern to apply for each resource. You must select a start date for the availability pattern however, end dates are optional. If you choose not to provide an end date for the resource, the pattern will recur continuously for that resource. select a start date for the availability template

  8. Click Save to apply the availability pattern to the selected resources.

The availability pattern is applied to your Availability Calendar for the time period specified (or ongoing if you have not specified an end date for the pattern).

availability patterns on the availability calendar

Creating a custom availability pattern

Availability patterns replace availability templates when availability patterns are enabled for your Skedulo organization.

You can create an availability pattern the same way you create availability templates through the Skedulo Web Application availability console.

Availability patterns differ from availability templates in that they can recur either weekly or in a custom recurring pattern.

Custom recurring patterns are defined by the number of days in the pattern, with the pattern starting on the day you specify for each resource you assign to the pattern.

Prerequisite

You must have availability patterns enabled for your organization. To have this feature enabled, speak to your Skedulo Customer Success contact.

  1. In the Skedulo Web Application, click Availability > Calendar.
  2. Click Add new in the upper-right corner, then select Availability template.
  3. The Availability template modal for availability patterns includes two tabs: Pattern and Resource.
  4. In the Availability Template modal, select the Custom pattern type.
  5. (Optional) Provide a name for your template.
  6. Select the Pattern length up to 28 days.
  7. Create the availability pattern based on the days the resource should be available and the time of availability for each day, or select All day to make them available for the entire selected day. This example uses the “four days on/four days off” availability pattern discussed earlier in this section. create custom availability pattern
  8. Click Save to save the pattern and move to the Resources tab.
  9. Select the resources you want to have the availability pattern.
  10. Select the start date for the pattern for each resource. This is the day the pattern will start for each individual resource. selecting the start date for the pattern for each resource
  11. (Optional) Provide an end date for when the availability pattern should end for each resource. If no other pattern is applied from this date the resource will become unavailable from the next day.
  12. Click Save to apply the availability pattern to the selected resources.

The availability pattern should appear in the Availability Calendar for the resources based on the start date for each resource.

the custom availability pattern in the calendar

Modifying an availability pattern

After you have created an availability pattern and assigned resources to it, you can still modify the pattern by clicking the recurring timeslot in the Availability calendar then clicking View details on the availability details card.

This re-opens the Availability template modal for you to edit.

Availability requests

Create an unavailability request using the web app

Schedulers can create new availability requests at any time directly from within the web app. In the top-right corner of the console, there is a large + (plus) button, clicking on this reveals a dropdown menu with options to create Unavailability or create Availability.

Availability filter options

In the top-right corner of the availability request view filter (a dropdown menu) that allows a scheduler to view upcoming requests only, past requests only, or all requests.

Additionally, the filters in the filter bar can be really useful to locate specific assets or resources. The following filters are available to be used on the availability request list:

  • Region.
  • Resource type.
  • Availability type.
  • Availability status.
  • Resource.

For instance, if a scheduler wants to see all requests for a single resource (in this example “Dexter”), then all they do is add and apply a resource filter.

To remove a filter click on the small cross next to the filter in the filter bar.

Approve or Decline Availability Request

When either a resource or a scheduler creates a request for Unavailability, the request will be logged in the availability console.

From here, the scheduler can approve, decline or delete a request using either the three-dot menu (to the right-hand side of the request) or by selecting the individual and using the Decline/Approve buttons just beneath the main filter bar.

The following details are available on the console:

  • Resource (name).
  • Type (e.g., sick leave, occupied).
  • Notes (text comments).
  • Created (date).
  • Start (date/time).
  • End (date/time).
  • Conflict (Job Name).
  • Status (Pending/Approved).

Some of the columns (type, created, start and end) can be sorted. The default sort is based on the column named Created (with the most recent date first). When you go off-page and return, this default will apply.

An availability selected for approval or decline.

Unavailability conflicts

An alert warns the scheduler if a request for “Unavailability” overlaps (or conflicts with) a scheduled job. Any conflicting jobs are listed in the Conflicts column. The scheduler can click on the job name to inspect the job’s details.

Reschedule jobs conflicting with availability

When a resource’s availability request conflicts with a job, the scheduler can reschedule the resource’s allocated jobs to a period when they are next available (within seven days after their unavailability ends). Or can reschedule the jobs to a different resource if required. This can be useful in the event a resource falls sick, for instance.

To reschedule a conflicting job, click on the options menu (3-dots) at the end of the table row where the conflict is displayed. Then select Reschedule jobs from the options provided.

Rescheduling a job that is at conflict with the availability of a resource.

The Reschedule Jobs modal provides the following options:

  • Reschedule the job(s) using the same resource to the next time they are available.
  • Reschedule the job(s) using the best available resource (i.e., a different resource), while retaining the allocated job times.

Choose one of the above options.

The rescheduling of jobs is performed using Skedulo’s intelligent scheduling engine.

From the results select the option that provides the best outcome and click the Reschedule jobs button. The job (or jobs) will no longer conflict with the unavailability.

The reschedule jobs modal.

Manage availability types and Enable Beta features.