View and manage work details
Overview
The work details page presents all the information about the work and additional functionality in the following tabs:
- Details. High-level information about the work and resource allocation functionality.
- Schedule. A swimlane view of the allocated resource’s availability and timings for the work.
- Tasks. A list of tasks that can optionally be added to the work.
- Notes. Notes for the resources and Completion notes from the resource. Completion notes are optional and must be enabled in the web app Settings.
- Attachments. Area to attach files relevant to the work.
- Fields. Custom fields that may be configured for your team.
- Attendees. Only visible if enabled in the Actions drop-down. It is for adding multiple contacts for group events.
- History. A filtered list of the work’s change history.
There are several ways to view a work item’s details page:
- Click anywhere on a card in the work card list on the scheduling console;
- Click the JOB number on an allocated work item’s card in the swimlane;
- Click the Details
 button on an allocated work item’s card in the swimlane; or,
 - Click an item’s Description in the Work console.
Work details page main components

The top of the work details page contains the following components, no matter which tab is selected:
| No. | Description |
|---|---|
| 1 | Page header. |
| 2 | Actions drop-down menu and Dispatch button. |
| 3 | Tabs for related data. |
Page header
The page header provides a summary about the work, including its scheduled time, status, and resource allocation.
The title is populated from the Description field. (When populated with text, it will display the first 34 characters when fully scaled). If there is no description, the JOB number is displayed by default.
Edit the scheduled time and date by moving the cursor over the values and clicking the highlighted area.
If a work item has time constraints configured, an icon ( ) is displayed to the left of the scheduled time information. Hold the cursor over the icon to display the time constraint information.
Time constraints
If you schedule work at a time that violates the time constraint, the icon will display as red.

Actions and Dispatch
The Actions drop-down menu provides additional functionality that can be applied to the work:
- Lock. Locks the work, ensuring it is no longer possible to edit the fields.
- Allocate resources. Opens the Select Resource(s) modal, where you can allocate resources for the work.
- Make recurring. Opens the Create Recurring Pattern modal, where you can create a recurring schedule for the work.
- Enable attendees. Adds the Attendees tab to the work so that multiple contacts can be added.
- Unschedule and deallocate. Removes the schedule and resources from the work.
- Complete. Manually complete the work.
- Cancel. Changes the work status to Cancelled.
- Restore. Removes the Cancelled status (not available if Resource Requirements are enabled).
- Open in Salesforce™. Opens the work in the Salesforce™ CRM (only available on Skedulo for Salesforce™).
The Dispatch button notifies all allocated resources of the new work.
The tabbed panels
The tabbed panels provide access to all data related to the work. The tabs are described in detail below.
Details tab
The Details tab is displayed by default when you open the page. It displays additional information, such as promoted fields and whether the work belongs to a recurring schedule.

To edit the details:
- Move the cursor over the text you want to change and then click the highlighted area to enter edit mode.
- Click Save to apply the changes or Cancel to exit edit mode without without making changes.
Time constraints
Time constraint information is displayed on the Details tab.
Click Add constraint to add a new time constraint.
To edit an existing constraint, move the cursor over the constraint information and click the highlighted area to open the Edit Time Constraint modal.
Resources
In the Resources area, the following actions can be taken:
- Add or remove resources from the work.
- Assign or unassign a team leader (this functionality must be enabled in the web app Settings menu).
- Edit the work requirement in terms of number of resources and skill tags.
- Send a work offer.
- View the status of allocated resources.
- Choose how to notify the allocated resources of the work.
- Manually confirm or decline work on a resource’s behalf.
For more information, see Add resource requirements and Allocate work.
Team Leader
The Team leader feature allows one of your allocated resources to process work from their mobile device on behalf of all the other allocated resources. This relieves the other resources from the responsibility of updating the work status, allowing them to concentrate on other tasks.
Enable team leader functionality for work items with multiple resource requirements (MRR)
To enable the team leader functionality:
- Navigate to Settings > Scheduling > Jobs. Admin permissions are required.
- Under Job status, click the Allow the team leader to set the job status for all allocated resources checkbox so that it is selected (blue).
With this feature is enabled, when the Team leader changes the status of a work item on their mobile device to In Progress or Complete, the team leader’s status changes and associated time records will apply to all resources allocated to that work item. For example, when the team leader changes the status on their mobile device to In Progress, the status and the status of the other allocated resources is also updated to In Progress. However, if a resource changes their status to Complete when the team leader’s status is still In Progress, then the status of the work item will remain In Progress.
In addition, when the team leader changes the status on behalf of the team, the team leader’s times in the Actual times tab will be taken as those for the work item as well. In this case, the Actual times tab will not show data for the other resources, unless they have manually changed their status as well.
If there is no team leader assigned on work with multiple resources, or if the setting above has not been enabled, then the time at which the last resource completes the work will be taken as the end time for the work.
Assign a team leader
To make one resource the team leader for a work item:
- In the Resources section of the Work details page, click the Team leader drop-down. The drop-down list is populated with the names of all resources allocated to the work item.
- Click the resource you want to be the team leader. A TL label appears next to their name.
Note that only one resource can be set as the team leader for the selected work item.
To reset this nomination, select None from the Team leader drop-down list.

For more information, see Customize scheduling workflow.
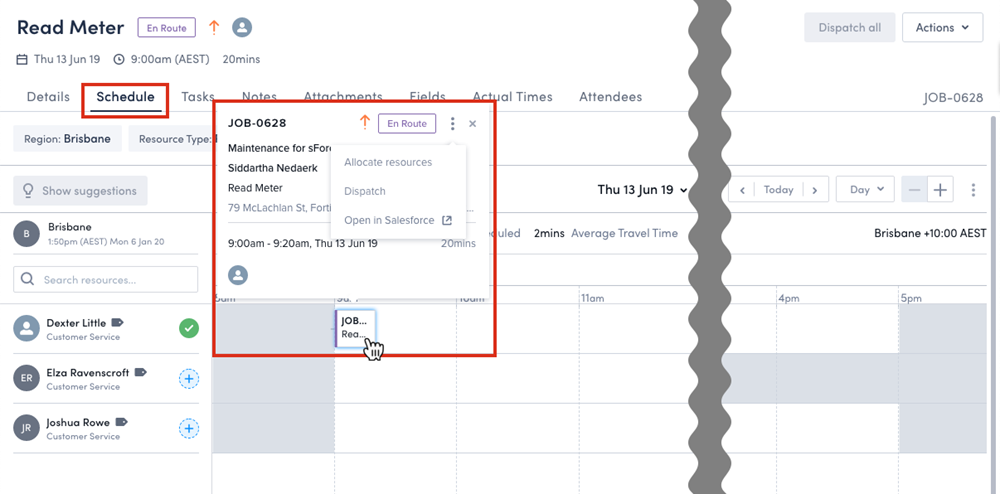
Schedule tab
The Schedule tab gives schedulers the ability to view the resources’ availabilities and make changes to the date, time, and duration of the work after it has been scheduled.
This page presents data for a day, 3 days, or a week.
After setting the date, time, and duration of the work, the scheduler can make changes by dragging and dropping the work, or extending or contracting its boundaries in this tab.
Click on the work item to view a summary of its details.
Note
If a work item has no address, then the work item that follows it will not show an estimated travel time as it is not possible to calculate it.For more information about how to change the view on the schedule swimlanes, including only showing working hours, see the Horizontal swimlanes and Vertical swimlanes documentation.
Filter the schedule swimlanes
Schedulers can apply multiple filters to the swimlane.
- Click Add filter.
- Select the filter you want to apply from the drop-down list. The new filter is added to the filter bar with a drop-down list of options.
- Choose one or more filter options from this list.
- Click Apply.
The filter bar updates with the new filter and the filtered results are shown in the swimlane.
Filter types available:
- Region. You can select multiple regions to be displayed in the swimlane.
- Resource Category. You can select multiple resource categories from the picklist.
- Resource Type. Defaults to Person, with the ability to choose other options in the picklist.
- Tags. (This option is available when requirements have been set). Hidden by default.
Tasks tab
The Tasks tab contains any tasks that have been added for the work and enables you to add further tasks.
- Click Add a task.
- Provide a task name and, optionally, a task description.
- Click Save to create the task and add it to the work.
If the work is part of a recurring schedule, you can select the tasks in the task list that you want to copy over to future work.
To copy tasks across multiple work items in a series, select the tasks you want to copy, then click the Copy tasks button.
Notes tab
The Notes tab contains any notes that have been added for the work and enables you to add further notes. It also displays completion notes.
Create a new note
To add a note:
- Click Add note.
- Type the notes into the text box provided.
- Click Save to save the note to the work, or click Cancel to return without saving the note.
Completion notes
Completion note functionality is optional and must be enabled by selecting Enable job completion notes in Settings > Scheduling > Jobs. Completion notes that are made by a resource (using the Skedulo mobile app) are synchronized and made visible just below the notes section.
Tip
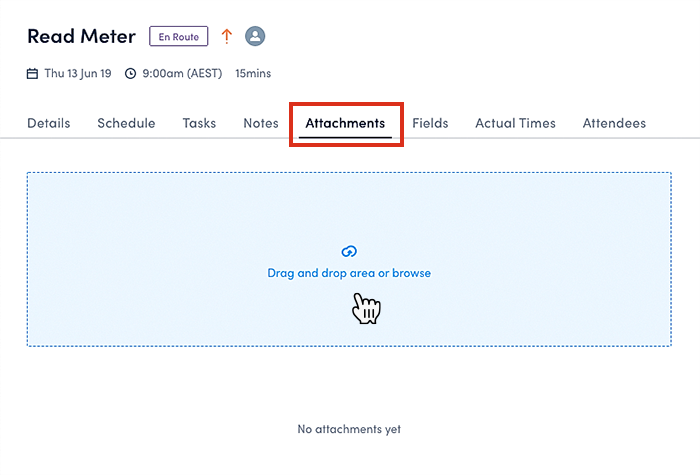
The Notes and Completion notes fields can take up to 32768 text characters each.Attachments tab
View and add attachments to work using the Attachments tab.
To add attachments, drag-and-drop from your computer, or click the drag-and-drop area to open the file browser to locate and attach files.
For more information, see View, add, and delete attachments.
Fields tab
The Fields tab displays any custom fields that have been configured for the work. These may differ based on your team’s specific needs.
For more information, see Work custom fields.
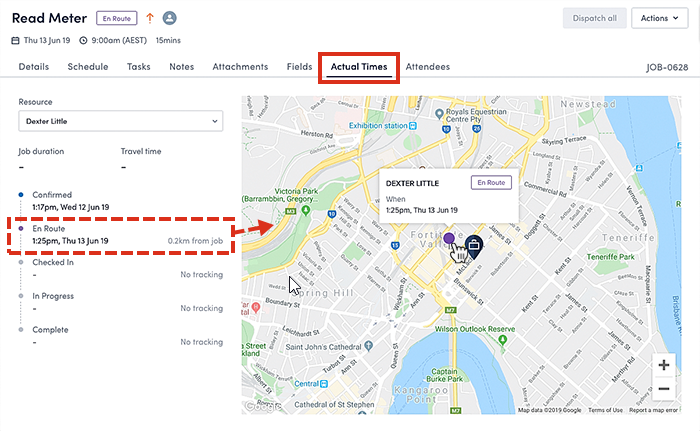
Actual Times tab
As a resource completes a workflow action (e.g., accepts the work, checks in, or completes the assignment), their times are dynamically recorded on the Actual Times tab. Travel time and work duration are also recorded here.
To view the actual times for one of multiple resources allocated to a work item, click the Resource drop-down and select the individual you want to view details for. Team leader times can also been seen this way.
Note
If resources are permitted (via the admin settings) to manage the times of the work from their Skedulo mobile app, any changes made will be instantly reflected here.Attendees tab
The attendees list enables a scheduler to create a single work item allowing their resource(s) to service multiple customers (contacts), over multiple accounts at the same time, i.e., at a group event.
Enable Attendees
To enable the Attendees feature, click Actions > Enable attendees on the Work details page header.

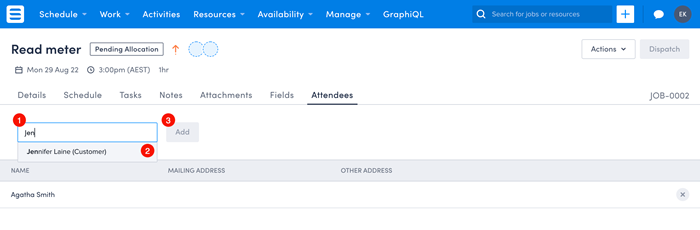
Add multiple contacts
Note
Attendees must be enabled to add multiple contacts.To add contacts on the Attendees tab:
- In the Search for contact field, enter the contact name you want to add.
- Click the contact in the search results.
- Click Add. The contact appears in the attendee list.
Repeat these steps to add all the required attendees.
Optionally, you can click the contact’s name in the list to see or change their details.
Contacts can be removed from the list by clicking on the “X” to the far right of their name.
Note
If the work is locked, attendees cannot be removed from the list.Feedback
Was this page helpful?