Filter bar
Overview
The filter bar appears in many of the core views in Skedulo. When filters are applied using the filter bar, they present a subset of the data available. This enables different tasks to be accomplished from the same view. The filter bar gives a quick visual representation of what filters are being applied at any one time and they can be changed, saved, and reused at a later date.
Default filters
Almost every view that contains the filter bar has a default set of filters applied based on the context of the view. Based on the view, some filters might be removable or editable while others might not.

Add filters
To add additional filters to your view:
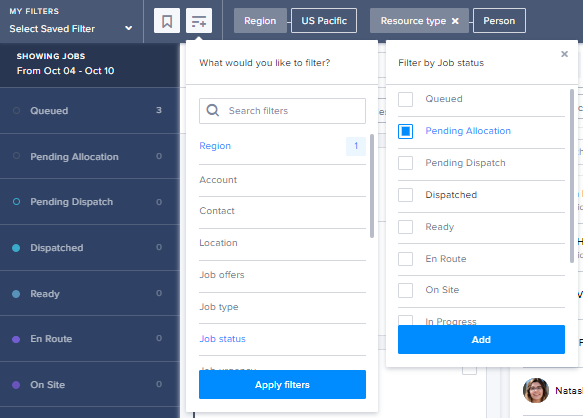
- Click the Add Filter button
 on the filter bar to open a panel that lists all of the available filters that can be applied in that view. The list of available filters is contextual to the page that is being viewed and different pages show different sets of filters.
 - From the dropdown list, click a filter category to view the available options. Select one or more of the given options and then click Add. Some filter categories only show a search box instead of listing the options. Enter a search term in the input box to fetch a list of options that are filtered by the term entered.
- Once all the filter categories you want are added, click Apply Filters to add them to the filter bar.
Note
If you do not click Apply Filters after making your selection, you will lose your changes.Update and remove filters
Modify individual filters by clicking on the relevant filter name on the filter bar.
Delete individual filters or entire filter categories by clicking on the X by the name of the filter (if applicable). You can also update or remove filters by clicking the Add Filter button and going through each filter category, updating and then reapplying them.

Save Filters
You can save frequently used filter combinations so that they can be reused later on.
- Click the Save Filter button
 on the filter bar.
 - In the Save Filter Set dropdown, enter a name for the filter combination.
- Click Save.
Saved filter combinations can quickly be restored by clicking on the My Filters drop-down and selecting a saved filter.

Delete a saved filter in this panel by moving the mouse over the three vertical dots to the right of a filter’s name and clicking the delete icon which appears.
Bookmark and share filters
Every filter combination results in a unique URL. Therefore, it is possible to save the filter combinations using a browser bookmark. Once a bookmark is saved, it can be shared with other schedulers in your organization. This will allow them to access the same set of filters.
Filter bar deep dive
To better understand the role of the filter bar, let’s walk through a few scenarios using the job status filters on the Schedule console. All these filters apply to the work list.
Examples of filter combinations that can be applied to the work list:
| Scenario | Action |
|---|---|
| Jobs in a given region. | Region: Select region. |
| Jobs that have been dispatched. | Job status: Dispatched. |
| Jobs that have been allocated but not dispatched. | Job status: Pending Dispatch. |
| Jobs that have not been allocated to any resource. | Job status: Queued. |
| Jobs that are currently in progress. | Job status: Ready, En Route, On Site, In Progress, Complete. |
It is also possible to have more complicated work list combinations by selecting more than one filter at a time.
Example of more complex filter combinations that can be applied to the work list:
| Scenario | Action |
|---|---|
| Jobs that have been allocated and dispatched to a single resource. | Job status: Pending Dispatch, Dispatched.Allocated resources: Select resources. |
| Jobs of a specific job type with the highest urgency. | Job urgency: Critical.Job type: Select the job type. |
| Jobs with specific job skill tags assigned to a few categories of resources. | Job tags: Select the job tag.Resource category: Select categories. |
Using different combinations of filters allows you to drill down to view the particular data set. On any given page, the applied filters may only affect a subsection of the view on that page. The examples in the tables above apply exclusively to the work list–there are other filters that apply to the swimlane or the map.
The FB is contextual to each page, and the list of available and editable filters changes based on the given view. For example, the filters available on the scheduling console are different from those that are available in job details or resources.
Some filter sets are also mandatory and cannot be removed. A good example of this is the region filter. Almost all views currently use a single region filter, and this cannot be removed. There are also instances where filters are set based on the data that they represent. For example, on the job details page, the region filter is set based on the job that it’s representing. This means that changing the region of the job will also change the region on the filter bar.
There are also times where filters are set based on the data they represent. For example, on the job details view, the region filter is set based on the job that it’s representing. This means that changing the region of the job will also change the region on the filter bar.
Important
Administrators, it is important that you do not edit the Urgency pick-list (drop-down list), as this will cause problems with the optimization functionality. For more information on how urgency is used for optimization, see the intelligent scheduling support page.Most filter sets are obvious and easy enough to understand. However, you can go into the subsection of filter sets listed below for more details on any given filter. It’s important to note that this is not an exhaustive list of filters since many filters are context-sensitive.
- Region.
- Account.
- Contact.
- Location.
- Job type.
- Job status—ties into the status panel as well.
- Job urgency.
- Job tags.
- Allocated resources.
- Resource type.
- Resource category.
- Resource tags.
Note
-
Resource tags currently present results using “OR” logic, i.e., Tag “A” or tag “B,” rather than tag “A” and tag “B.”
-
Users can only filter the swimlanes by Region, Resource type, Resource category, and Resource tags. See Horizontal swimlanes and Vertical swimlanes for more information.
Feedback
Was this page helpful?