Manage resources
Overview
The Resources console provides a scheduler with a way to view all resources. It offers ways to filter records by region, as well as by attributes and categories.
The resources console is accessible via the navigation menu. Two options are available:
- People. This displays the resource list.
- Assets. This displays the asset list.
People resources
Resource list
The resource list shows all of an organization’s active and inactive resources. Active resources, marked with a green tick mark, are shown by default. Deactivated (inactive) resources can be viewed by selecting the Show deactivated resources checkbox.
Click a resource to open its details page where you can view and edit data related to that resource. The data is split into different tabs.
Schedule tab
The Schedule tab gives schedulers the ability to quickly and efficiently manage a single resource. This tabbed page presents real data for a day or a week.
- See all their activities and jobs for the current week (with the current day highlighted blue) or per day (with a current time indicator visible).
- View the scheduled job allocation times for their jobs.
- View the current job allocation status without having to refresh the page (the job allocation status changes are updated live and show the current status).
- View a resource’s availability and unavailability as configured via their availability templates or as a one-off event (Holidays are viewed as unavailability).
- Navigate quickly to a specific calendar date—then back to “Today.”
- Quickly view and access a job’s details (via the pop-up summary).
It is possible to adjust the start and/or end time of a job in the schedule by dragging-and-dropping the job card in the calendar timeline.
To adjust the duration of a job, hover-over the top or bottom of the job card (the cursor will change) and drag the edge up or down to adjust the time.
Fine-tune any job card adjustment using the snap unit settings (located at the top-right of the calendar). The following snap settings are available:
- 1 minute.
- 5 minutes.
- 15 minutes.
- 30 minutes.
- 1 hour.
On the schedule, a resource’s general availability is represented with white blocks of time. For organizations that use shifts, time blocks are rendered dark blue/gray.
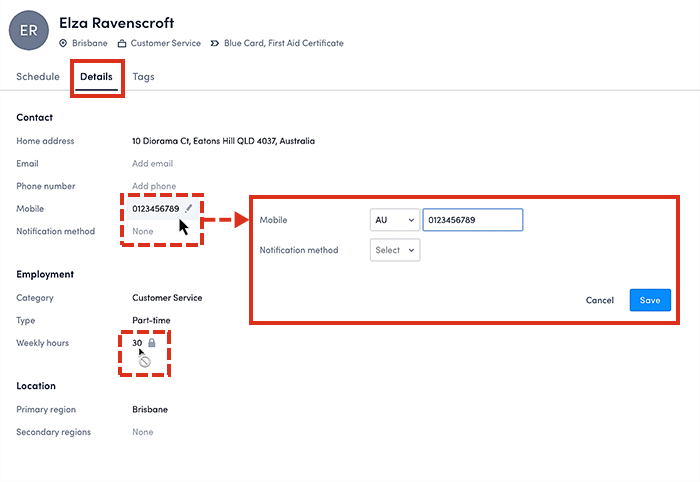
Details tab
The names in the resource list are also text links. Click on a name to open the resource’s details. Symbols to the right-hand side of the fields indicate either locked or editable:
- Contact:
- Home address.
- Email (address).
- Phone number.
- Mobile (edit to expose country code and number).
- Notification method (Push or SMS).
- Employment:
- Category.
- Type.
- Working hours (an optional feature used in conjunction with shifts).
- Weekly hours (locked).
- Location:
- Primary region (this is a mandatory field).
- Secondary regions.
For customers using Skedulo with their own CRM (e.g. Salesforce), the resource profiles are first created in the CRM. After polling, the resource data is then made available in Skedulo. To change a resource’s data, some fields are editable in Skedulo (depending on the permissions granted), others you will need to change in the CRM itself.
Related links
At the top of the view is the resource’s profile picture (or avatar)displays if one has been provided in their CRM profile (their profile image). If one is notavailable, their two initials are displayed in their place. There is also a short summary of the resource’s details (primary region, employment category and any associated skill tags).
Note
Notification Method (push or SMS) is the method used to send job notifications to the resource. Push notifications send a message to the notification center of the mobile phone so that the resource will see the notification pop-up on their screen. SMS notifications send a text message to the mobile phone number.Related links
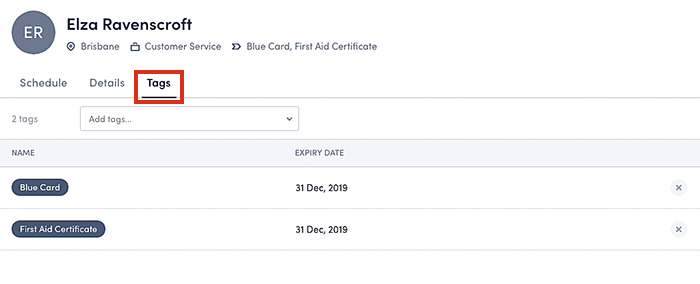
Tags tab
The Tags tab shows any skills associated with a resource (with the expiry date if applicable).
Related links
Asset resources
The Asset list page displays all the assets available for allocation. Clicking on the name of an asset opens the asset details view.
The asset list shows the items that may be used for completing jobs. Some fields are editable.
Related links
Search for and filter Resources
Use global search
Search for resources from the global search field, which is permanently available on the right-hand side of the top bar in the web app. Results will be automatically displayed as you type. This search will show both resources and jobs, grouping them under different headers.
Use the filter bar
The filter bar can be used to further refine the displayed results based on specific criteria, like filtering by region, category, and tags.
Change region filters
To change or add a region filter, click Region in the filter bar. Select the region or multiple regions required, and then click Update. The filter will then be applied.
Add additional filters
Schedulers can use multiple filters to help identify specific resources. To add additional filters:
- Click the Add Filter button.
- Select the filter.
- Select the filter option.
- Click Update.
- Click the Apply Filters button.
The new filter will appear in the filter bar, and the filtered results will be shown in the console.
Remove additional filters
To remove additional filters, click the small x next to the filter you wish to remove.
Feedback
Was this page helpful?