Create and update work
Overview
There are several ways to create work in the Skedulo web app.
- Create job page – Access this page from the navigation menu and use it to create a single or recurring work item.
- Quick job create – Quickly create and schedule work items from within the context of the main scheduling console.
- Map view – Create work at a specific location that has no official address.
Tip
You can create work with pre-filled data using the Skedulo APIs. See Create a new job or activity with pre-filled data for more information.Create work using the Create Job page
Use the Create Job page to create single or recurring work items for an account and address. This might also include scheduling information (date/time) or tasks.
To open the Create Job page:
- Click
 Create in the upper-right corner of the navigation menu to open the Create drop-down menu.
 - Select Job.
- Enter the required information and then click one of the save options:
- Save – Create the work and return to the previous location in your browser history.
- Save and view – Create the work and open the work details page where details about the work can be changed or allocated.
On the Create Job page, the required fields are marked with a red border on the lefthand side. These required fields must be completed before the work can be saved. The red border turns green when a required field is completed correctly.
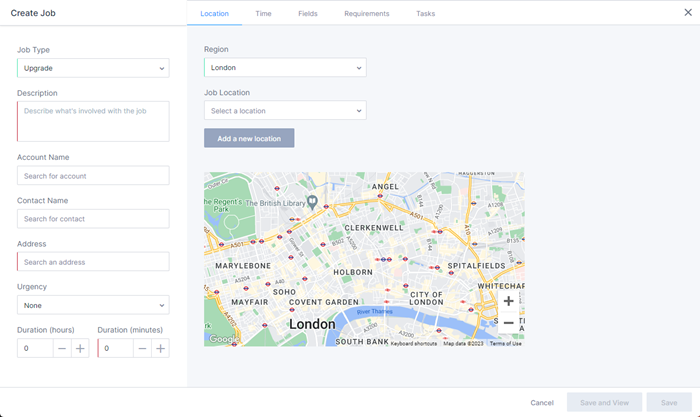
The required fields are:
- Job Type
- Description
- Duration (hours/minutes)
- Region
Optional fields include:
- Account name (pre-populates if the contact name is selected)
- Contact name
- Urgency (none, normal, urgent, or critical)
- Job location (If the site location has been configured within your account, select the location from the drop-down list. If not, click Add new location to manually add a location.)
Fields that are required, depending on configuration:
- Address (the place where the work will be performed unless a Job Location is defined). See the admin settings documentation for more information on how to control whether this field is required or not.
Note
One account can have many locations (addresses). Locations are optional in Skedulo because the destination of the work may simply be the account address.If you’re going to have multiple work items for different locations for the same account, create a location record. The address for the work item (which is populated from the location address) is used to calculate drive times and plot work on the map.
The Create Job page map
Schedulers can create work at locations that have no official address using the Create Job page map.
- Open the Create Job page.
- Click Create in the upper-right corner of the navigation menu to open the Create drop-down menu.
- Select Job.
- Click
- Complete the required fields. You can leave the Address field blank, since this will be auto-filled in the next step.
- Navigate to the location of the work on the map, then right-click and select Create Job Here. A marker will be placed at the location and the address and geolocation fields will be automatically filled.
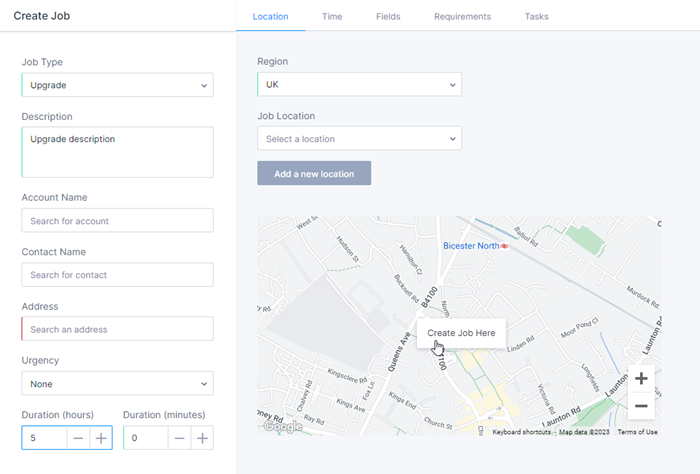
- Click Save to save the changes and create the work.
Additional tabs and fields
The following tabs and fields are available on the Create Job page:
The Time tab
Use the Time tab to:
- Assign a start and end date.
- Assign a start and end time.
- Apply time constraints to the work.
- Make the work part of a recurring schedule.
The Fields tab
The Fields tab displays any custom fields that have been exposed by an administrator.
These additional fields may be editable and may or may not show in the Skedulo mobile app.
The Requirements tab
The Requirements tab can be used to apply specific resource requirements to work that requires individual skills or certifications while specifying the number of resources that require those skills.
The Tasks tab
The Tasks tab allows the scheduler to apply a set of tasks that a resource must perform before that work can be completed.
Create work using Quick Job Create
The Quick Job Create panel allows for contextual work creation. Quickly create and schedule work items from within the context of the scheduling console while still being able to interact with the swimlanes and map.
Create work using the Map view
To create work at a specific location using the Map view in the Scheduling console:
- From the navigation menu, click Schedule > Map View.
- On the map, navigate to the location of the work.
- Right-click on the map to place a temporary marker.
- Click Create Job Here. This opens the Create Job page with the address and geolocation fields pre-populated.
Update work details
You can edit and update the various editable fields in the work details view.
To view a work item’s details page:
- Click Save and view when creating work using the Create Job page.
- Click a work item’s Description on the Work console.
- Click a work card on the Schedule console.
- Click
 View on the work details summary in the Schedule calendar.
Feedback
Was this page helpful?