Map view
Overview
Map view in the scheduling console is the main map of the application. Icons placed on the map represent allocated jobs, assets, activities, and resources (that are available to work). The number of icons shown, however, depends upon the number of filters that are applied.
How to access the map view
To view the map in the scheduling console, select Schedule > Map view from the navigation menu.
The map view opens zoomed out to include all jobs and resource locations for the defined period.
You can also access the map view from other places in the Skedulo web app:
- From a job card.
- From map view in the action bar.
- From the swimlane resource list.
- From the job details view.
Map view from a job card
You can view the location of a job in relation to other scheduled jobs from the job card. Click the map marker icon (labeled View on map). The map focuses on this marker to indicate its location and sets the date to be the same as the job start date.
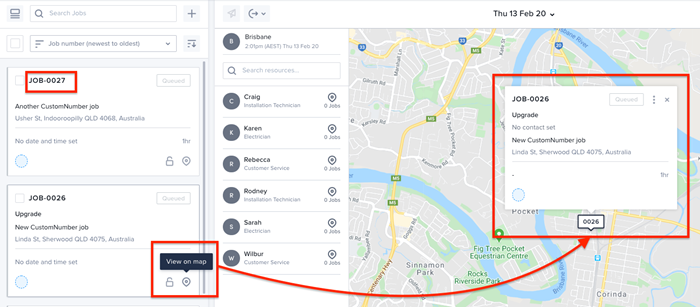
How to view the map from a job card.
Tip
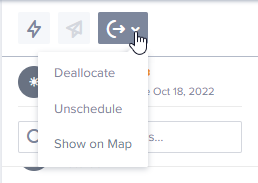
Queued and pending jobs can be viewed this way.Map view from the Action bar
Select a job from the work list (click the checkbox next to the job number or name), then go to the action bar and select View on map from the dropdown menu. The job’s map marker will animate (or bounce) on the map.
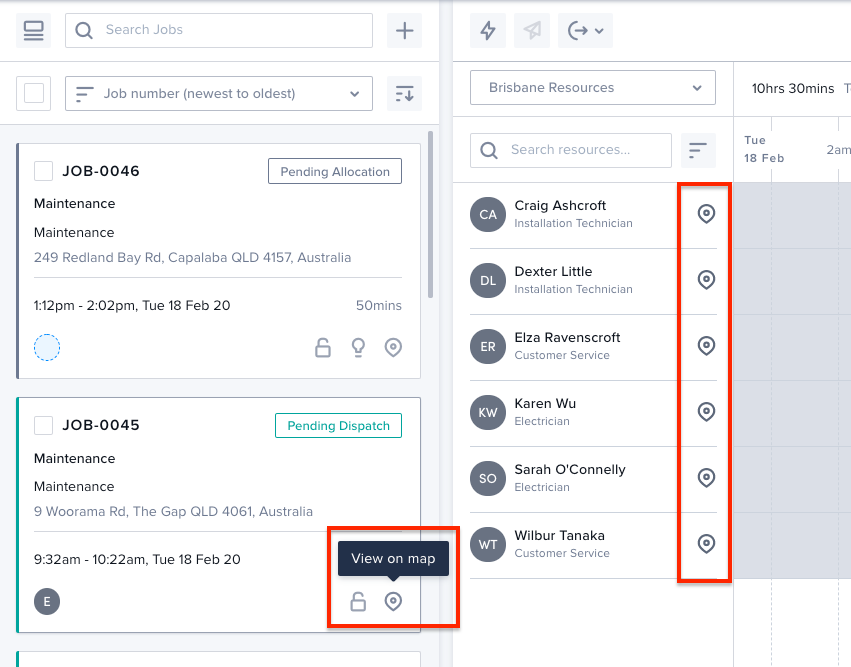
Map view from the swimlane
From the swimlane, the map displays all resources listed in the list resource view. By default, a resource marker is blue and shows the user’s initials.
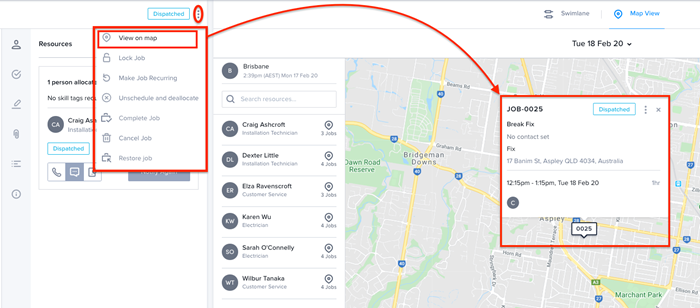
Map view from job details
From job details, click on the additional menu icon (above the right column) and select View on map.
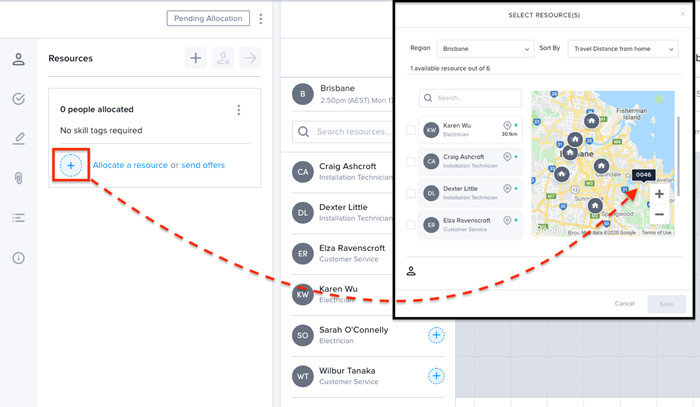
Another place to view the map is on the Select Resources modal. To view this map, click the blue plus button or Allocate a resource text link. This opens up the select resources panel and map, where all available resources (for that region) are displayed.
Filter map data
The map respects any filters that are applied in the filter bar. The filters that affect the data in the map are:
- Region.
- Resource type.
- Resource category.
- Resource tag.
Tip
Additional filters can be applied using the Map Layers options.How to use the map view
Map pan and zoom
The map has some zoom buttons at the bottom-right of the view. To zoom in using a mouse only, use the scroll button or double-click on the map itself. Pan around using the mouse action “click and hold.”
Map icons
The following table contains a list of the Skedulo-specific icons that can be seen on the map.
| Map icon | Icon type | Description |
|---|---|---|
 |
Home marker. | The home (address) marker is dark gray with a white house displayed at the center. This marker displays if:
|
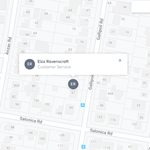 |
Resource marker (a). | The default resource marker is gray with white initials displayed at its center. This type of available resource is not configured with a social connection (e.g., Salesforce Chatter).
|
 |
Resource marker (b). | The socially connected resource marker is gray with a white silhouette displayed at its center. This type of available resource is configured with a social connection (e.g., Salesforce Chatter) but no profile image is available to be displayed. Roll-over the marker to see the resource’s name. Click on the resource marker to see their details. The map displays all the resources listed in the list resource view, i.e., active resources. |
 |
Active resource marker. | An active resource is marked with a small green dot, and while it continues to update its location (“Start Travel” has been selected in the mobile app), it pulses with a blue halo (see Resource Tracking). This resource has a social connection to Salesforce Chatter. If there is a profile image (or avatar), the marker displays that image instead of the white silhouette on a gray background. Roll-over the marker to see the resource’s name. Click on the resource marker to see their details including the last known time they were at the location (along with the relative duration). The map displays all the resources listed in the list resource view, i.e., active resources. |
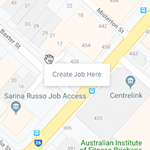 |
Create job marker. | On the map, right-click to create a job. Select the “Create Job Here” text to create a new job at that geographic location. The “Create Job” page opens ready for details to be entered. A left mouse click will remove the option and no new job will be created. Note: The new job will be allocated to the current region in the filter bar. |
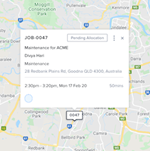 |
Queued or Pending allocation job marker. | Jobs that are Queued or Pending Allocation can be displayed in the Map View by clicking the “View on Map” button on the job card. They are labeled with the job number icon on the map. To view queued or Pending Allocationjobs:
|
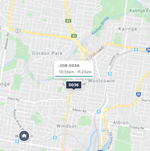 |
Allocated job marker. | Allocated jobs are represented by their job number on the map. The associated hover box displays relevant information about the job, such as the job number (or name), the scheduled start and end times, and a colored line representing the job status (green for Pending Dispatch, and blue for Dispatched). Click on the icon to open a summary of the job’s details. |
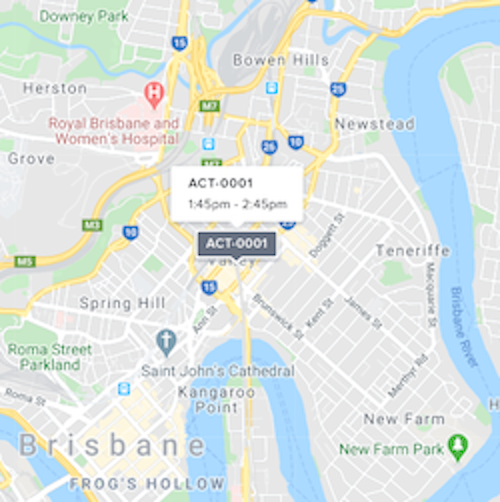 |
Activity marker. | Activities are represented by the activity number on a dark grey background. The associated hover box displays relevant information about the activity, such as the activity name and the start and end times. View the details of activities using the Activity Console |
 |
Job sequence marker. | A white number on a dark blue marker represents a job that is part of a sequence. It will appear only when route options have been triggered (for suggested and actual routes). The associated hover box displays relevant information about the job, such as the job name, it’s status and the start and end times. |
 |
Cluster marker. | Where several jobs and activities are allocated to (or near to) the same address or location, the markers are placed in a “cluster”. In some cases, zooming in will split the cluster apart. Conversely, zooming out might cluster jobs to declutter the map view (it depends on the proximity of the jobs). You can click on the cluster icon to see the numbers of the jobs/activities in the cluster. Click on the job number in the cluster details pop up to navigate to the job details page. |
Job details summary
Click on any job marker on the map to see a summary. The details included are:
- Job name (or number).
- Job-status.
- Allocate resources and dispatch (via the additional options menu).
- Job type.
- Job description.
- Address.
- Start and end times.
- Duration.
- Allocated resources (roll-over icon to view name).
- The job is locked (icon indicates on or off).
- Recurring schedule (with icon present).
Clicking on the job name will present the job’s full details (in the job details view). Queued and pending allocation jobs will appear with their summary open when View on map is selected from the additional menu.
Related links
Routes and map options
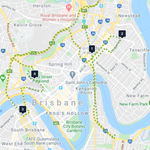
To see what route options are suggested per resource (for the selected date), click to toggle the resource on in the available resource list. Using the “Map Layout” options, switch between suggested routes (dashed lines) and the actual routes taken (solid lines) by this resource.
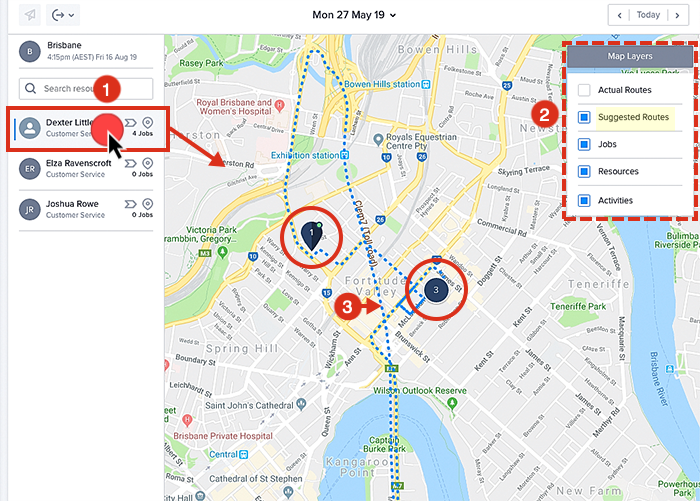
Things to note about route and route options:
- Once a resource is selected from the resource list, a color-coded route will display between the resource’s home location or if they have no home location, from the first job to the next job in the sequence they are scheduled–not from the resource’s current location.
- Route options are displayed only if a resource has jobs allocated.
- If the date selected is today, both actual and suggested routes are shown.
- If the date selected is in the future, then actual routes are disabled and only suggested routes are shown.
- When routes are displayed, all other markers are hidden except those that represent the route (i.e., the resource and its job allocations/activities).
- When routes are displayed, job and activity markers lose their icons and instead, have numbers applied–these represent the order in which they are to be completed.
- Actual routes are displayed as a solid line on the map (these are tracked from the mobile application).
- Suggested routes are displayed as a dashed line on the map (these are provided by the underlying web mapping service).
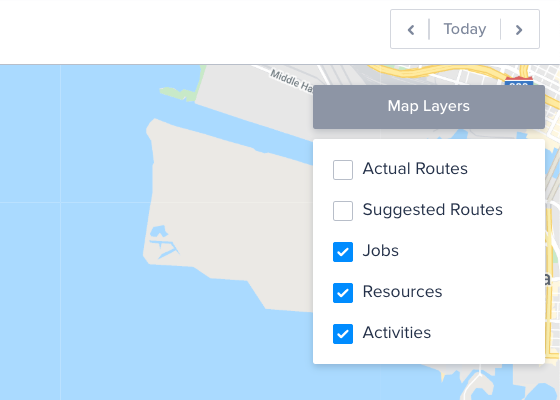
Map Layers
It is possible to filter the map objects view using the options in the Map Layers drop-down menu. The following layer filters can be applied (together or individually):
- Jobs.
- Activities.
- Resources.
- Suggested routes.
- Actual routes.
Action bar
The action bar date filter controls the details displayed on the map. This allows users to view all jobs scheduled for a single day. Step forward or backward in time using the day switch. The map zoom level adjusts automatically to show all the markers for the given date.

When navigating or stepping between dates: the markers presented on the map replicate the information on the swimlane (i.e., job allocations, activities, resources), and the routing information is reset.
Note
Unlike the swimlane, the map action bar does not have a date range. When a date range is applied on the swimlane, switching to this map view will display the first day of that date range.List resource view
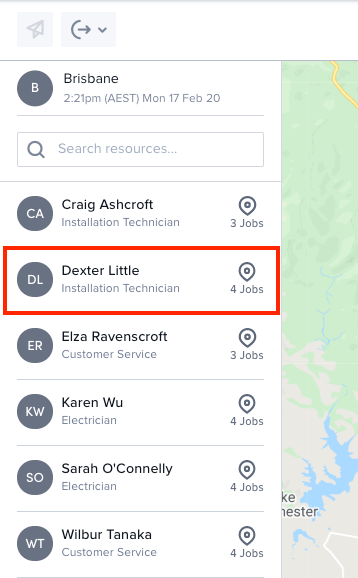
The list resource view provides a list of available resources, as on swimlane (in the same order). The job count represents the number of allocated jobs that a resource has for the given day (excluding canceled or rejected jobs). Click on a resource’s card to see the suggested route(s) to the job(s). Click anywhere but on the name or map icon as these open different views.
If the selected resource has no job(s) or activities allocated for the day, a warning will appear stating that there is no route to show. If the resource has no home address, a warning will appear suggesting to set this information.
When suggested routes are shown, the resource card displays a vertical line colored with the same color as the route on the map. When the resource map icon is clicked, the map is focused on the selected resource (the resource card can be toggled on or off).
Resource tracking
Resource tracking is only displayed if the selected date is “today.” If the location of a resource is known, the resource’s icon is marked with a colored indicator to show it is active. When there is a location update, the resource marker smoothly transitions to its new location.
Note
For resource tracking to work as described here, the resource must have location access for the Skedulo mobile app set to “Always” or “When using the app”. For details on how to change these settings, see the Skedulo Plus mobile app location tracking article.Feedback
Was this page helpful?