Use the Work console
Overview
Aside from the Schedule console, the Work console is one of the primary ways a scheduler can manage work within Skedulo.
The Work console
The Work console provides a list of all work created on your tenant along with a summary of key information related to each work item. You can then filter and sort this list to narrow it down to a set of work that needs to have a next-step action intiated.
To view the Work console, click Work in the top navigation menu.
The default view shows all upcoming work, 25 records at a time, with page controls located at the bottom of the console.
If there are no upcoming jobs, the message “You have no jobs yet. Create a job.” is displayed.
Columns in the Work console
All items in the Work console are displayed in a table. By default the table contains the following columns, some of which can be sorted by clicking on the small accent next to the title:
- Name/Description (can be sorted). Click this to open the work details page.
- Account/Contact.
- Job Type (can be sorted).
- Status (can be sorted).
- Address (can be sorted).
- Scheduled (can be sorted).
- Urgency (can be sorted).
- Job offers.
- Resource/s.
- Job number (can be sorted).
- Indication of whether the job has been locked.
- Indication of whether the job forms part of a recurring series.
To configure the display of these columns, navigate to Settings > Web app configuration > Work table. For more information, see View and customize tables.
Important
Administrators! It is important that you do not edit the Urgency pick-list (drop-down list), as this will cause problems with the optimization functionality. For more information on how urgency is used for optimization, see the intelligent scheduling support page.Work console filter bar
Time filter menu
The time filter menu is located in the top-right corner of the page. It has two options:
- Upcoming work (the default setting). This option displays all work scheduled for a time and date in the future, sorted by date-time from soonest to latest. This is a great way to quickly identify work that is in need of immediate attention. Upcoming work includes all work that has no date and time set, regardless of the status. Further filtering by status can be done by adding another filter. For more information, see Add multiple filters below.
- Past work. This option displays all work scheduled in the past. Note that this does not factor in the completion state of the work. Incomplete work will still be considered past work.
Region filter
The region filter is always applied. By default the Work console shows all upcoming work in the scheduler’s default region.
To show work in multiple regions:
- Click the Region filter in the filter bar.
- Select or deselect regions as required. At least one region must be selected.
- Click Update.
Add multiple filters
The Work console can be fine-tuned by adding one or more of the following filters in addition to the region filter:
- Account.
- Contact.
- Location.
- Job Offers.
- Job Type.
- Job Status.
- Job Urgency.
- Job Tags.
- Allocated Resources.
To add filters to the Work console:
- Click
 Add filter on the filter bar.
 - From the list that is displayed, click the name of the column you want to filter by.
- Refine the filter using the additional criteria that is displayed.
- Click Add.
- Repeat steps 2 to 4 for all filters you want to apply.
- Click Apply filters.
Save a custom filter set
If you frequently look up a list of work with specific filters, it can be quicker to save the set of filters for quick reference.
To save a set of filters:
- Apply the filters you want to save as a set.
- Click
 Save filter on the filter bar.
 - Enter a name for the filter set.
- Click Save.
The saved filters can be accessed in the MY FILTERS drop-down on the filter bar:
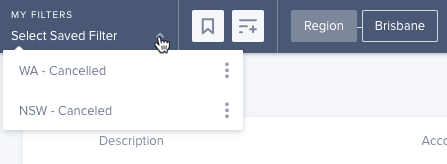
Saved filter sets
- To apply a saved filter set, click the MY FILTERS drop-down in the filter bar, and then click the filter you want to apply.
- To delete a saved filter set, hover over the menu icon on the filter you want to delete, and then click the trashcan icon.
Perform bulk actions on jobs in the Work page
Some actions can be applied quickly from the Work console. They can also be applied to more than one work item at a time. The following actions can be performed on work:
| Action | Description |
|---|---|
| Notify | Sends a notification of the selected work items to the allocated resource. This can only be done if the work has an allocated resource with a notification protocol set for their user. |
| Lock | Locking a job prevents any change to work details from within the scheduling pages across the web application. This includes changes to work details, like the scheduled date/time, or work requirements, like allocations. If the job is locked, none of these details can be altered. Resources can still successfully progress and complete a job that is locked in the web app. When a job is locked, a lock icon appears on the work list and on the work details page. |
| Unlock | Unlocks the work item so that information on it can be changed. Only locked items can be unlocked. |
| Deallocate | Removes all resource allocations from the work and returns its status to Pending Allocation. |
| Unschedule | Removes the date and time from the work, and changes the status to Queued. |
| Cancel | Changes the work status to Cancelled. |
To perform one of these actions on one or more work items:
- In the Work console, select the work items to act on. The available actions appear at the top of the list.
- Click the action. Some actions require you to take extra steps to complete the action, for example, deallocating work requires that you confirm the action and canceling work requires that you provide a reason.
Feedback
Was this page helpful?