Create and edit shifts
Overview
Creating and displaying shifts, directly within the Skedulo web app, allows schedulers to make better-informed choices while allocating jobs. Shifts are displayed in the scheduling swimlanes, providing the scheduler with a visual reference while allocating jobs, alerting them to conflicts with the unavailability of a resource.
The Shifts console enables the scheduler to comfortably prepare shifts ahead of time, using the inbuilt calendar and optional unavailability overlay. Once the preparation is completed, the shifts can be activated individually, or all in one go if preferred.
Note
The admin settings for shifts need to be enabled and the Shifts console needs to be added to the navigation menu before users can make use of this feature.Create shifts
To access the Shifts console, click Shifts on the navigation menu.
Note
An administrator is required to add Shifts to the navigation menu. Depending on the how the navigation menu is configured in your team, the Shifts option may be accessible directly in the navigation menu or nested under another heading, for example, Manage > Shifts.There are two options for creating a shift using the Skedulo web app:
- Use the Create Shift button (at the top-right of the shifts calendar) to open the Create Shift model.
- Choose a resource and date then right-click in the blank space in the shifts calendar. An option to Create shift will become available. The resource will already be allocated using this method therefore only the shift details are required for the shift to be completed.
Using the first method above, perform the following steps:
- In the Shifts console, click the Create Shift button to display the Create Shift modal.
- On the Details tab, enter all required shift details. Note, the tags field will only be available if the Shift Tags feature has been enabled for your organization.
- On the Resources tab, select all resources that are to be allocated to the new shift (filters are available to identify specific groups or individuals).
- Check the allocations are correct and adjust if necessary.
- Click Create.
Once created, draft shift cards (in the calendar) are displayed with a dashed dark-gray border. This must then be Published before the resource(s) can see it.

Assign a resource to a shift
A scheduler has a few options when assigning shifts using Skedulo:
- Assign a resource when the shift is being created.
- Assign a resource by editing an existing shift.
- Drag an allocated shift card from one calendar swimlane to another, i.e., change the resource. Note, this method returns the shift card to its draft state. It requires publishing before the new resource will see it.
Related links
Shift tags
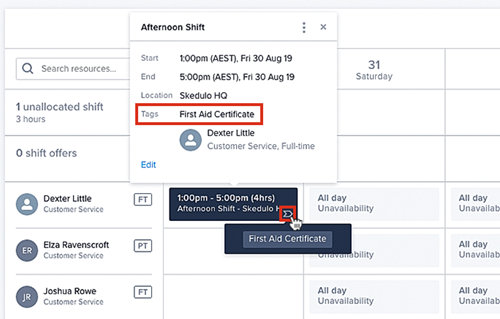
Shift tags provide the scheduler a way to filter their resources, matching those who have specific skills (or credentials) to a shift.
The shift tags themselves can be added when creating or updating a shift. Resources that match the applied tags are shown in the Resources tab of both the Create and Edit Shift models. A red exception icon appears when the assigned resource does not match the tagged requirements for the shift.
Shift conflicts
Shift conflicts can be seen when viewing shifts in the Week view. If there is a conflict between a shift and a resource’s availability or skills (tags), a small exception icon will display in the top-right corner of the shift card.
These icons highlight:
- Any shift that is scheduled outside the availability of a resource (or overlaps with another shift).
- Any resource that lacks the shift requirements (displayed when the “shift tags” feature is enabled).
Edit a shift
To edit a shift, perform one of the following:
- Right-click on a shift card (draft or published).
- Select Edit from the drop-down options to open the Edit Shift modal.
- In the edit modal, edit the existing values, e.g., change the date or add a new resource.
- Click Save.
- Click on a shift card (draft or published).
- From the summary of the shift’s details, click on the text link named Edit to open the Edit Shift modal.
- In the Edit Shift modal, edit the existing values, e.g., change the date or add a new resource.
- Click Save.
- Click on a shift card (draft or published).
- At the top-right of the shift’s details is an additional menu. Click edit to open the Edit Shift modal.
- Edit the existing values, e.g., change the date or add a new resource.
- Click Save.
Note
-
When a shift card is edited and saved, only that single card is changed. If two or more resources share the same shift, e.g., “Morning Shift,” the same edit must be made to each resource’s shift card (if that is the intention) –a single edit will not change all instances of the shift.
-
When adding additional resources using “Edit,” all new instances of the shift card will appear in draft format first, i.e., they need to be published before the resource(s) will see the shift in their mobile app.
Publish shifts
Unique to the Skedulo web app, shifts go into a draft state when they are first created. This draft state enables the scheduler to make final adjustments before they are activated. In their draft state, shifts are not visible on the scheduling swimlanes nor in the Skedulo mobile app.
Schedulers have two options when publishing drafts, they can do so individually, or all at the same time.
To publish a single shift, either right-click (and select Publish from the menu options) or left-click on the draft shift card in the shifts calendar. A left-click displays the shift’s details (its title, start and end time and dates). At the top-right of this pop-up is an additional menu with three options: Publish, Edit, or Delete. Click publish to activate the shift. Once published the shift card in the calendar is displayed using a solid dark color.
A scheduler needs only to click on the highlighted Publish x Shifts button, located at the top-right of the shifts calendar, to publish all draft shifts at the same time. Once published, the shift cards in the calendar are displayed using a solid dark color.

Copy shifts
It is possible to copy shifts (published or draft) to other dates in the calendar. Open the Copy shifts modal using the Copy shifts button, which appears in the dropdown menu located at the top-right of the shifts calendar (the vertical ellipsis next to the Publish button).
The Copy Shifts modal has a few options to configure before clicking the Copy Shifts button:
- Select Region: Only shifts that belong to this region are copied (defaults to the region set in the filter bar of the shifts calendar).
- Location (optional): Copy the shifts from a specific location instead of the whole region. Location as defined in Creating Shifts.
- Select Period: Using the drop-down menu select days or weeks—this isolates the period used to identify the shifts to be copied (which are highlighted in the calendar). The initial value is the same as the period shown in the shifts calendar.
- Select Calendar Date (“Copy from” and “Copy to.”) The left-hand calendar (copy from) indicates the days that shifts will be copied from (if any exist). The right-hand calendar (copy to) indicates where the shift(s) will be copied, i.e., Their destination—dates start one week after the selected date in the left-hand calendar. Note: Confirmation of the actual dates to be copied are listed beneath the calendars.
- Checkbox options:
- Ignore resource allocations - all copied shifts will be unassigned (OFF by default). Check this option to ignore previous resource allocations. All copied shifts will then appear in the “Unallocated Shifts” swimlane.
- Include unpublished shifts (ON by default). Check this option to copy both published and unpublished shifts for the period defined.
Note
-
It is possible to select a consecutive date range (to copy) anywhere between one day up to fourteen weeks.
-
All copied shifts will appear on the target date(s) in a “Draft” state (i.e., unpublished), this is to give schedulers full control over the process. Once published, resources can then be notified.
-
Where applied, shift tags will also be copied.
Duplicate shifts
Using Duplicate gives schedulers the ability to instantly create multiple copies of the same shift, reducing the time it takes to create a roster.
There are two ways to duplicate shifts: via the options menu within the shift information pop-up, or via the right-click menu on a shift card. Clicking on Duplicate (via either option) will open the Duplicate Shift modal, here the scheduler can set the quantity required.
If a resource has already been assigned, a checkbox appears “Ignore resource: duplicated shifts will become unallocated.” This checkbox controls whether the duplicated shifts include the same allocated resource—if not they are moved to the “Unallocated Shifts” swimlane.
When the scheduler clicks the Duplicate button, additional shifts are created with the same date/time and name. Once performed, the scheduler can move the duplicated shifts to other swimlanes or dates.

Note
The duplicate option is available for all shifts, whether they are published or draft (allocated or unallocated).View shifts
To view the shifts that have been created there are three options:
- Use the Skedulo web app Shifts console.
- Use the Skedulo web app scheduling console.
- Use Salesforce (via the “App Launcher” and “Shifts”).
View shifts in the Skedulo Shifts console
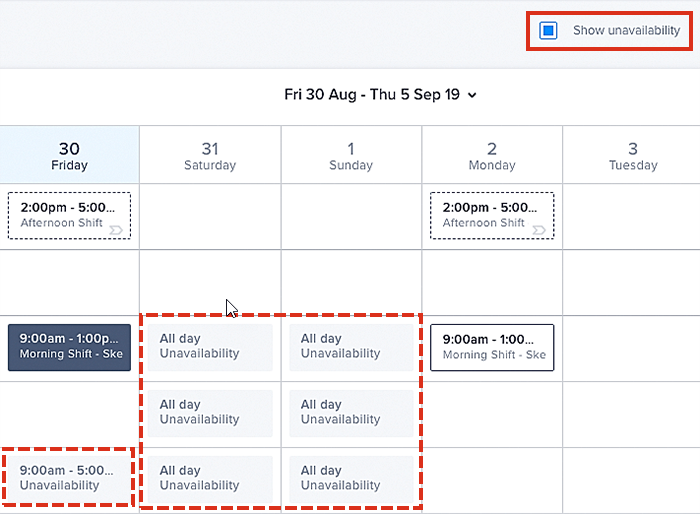
The shifts console provides schedulers with a view of both draft and published shifts per resource, per region. They can also overlay their resources’ availability by selecting the Show unavailability checkbox, at the top-right of the shifts calendar.
View a summary of a shift’s details by clicking the shift card. The following are available in the pop-up:
- The shift’s title (optional).
- Start and end times.
- Shift state (if in “Draft”).
- The allocated resource details (when “Published”).
- An Edit link (when clicked will open the shift in the Edit Shift modal).
- An extra options menu (which provides options to “Edit,” Publish," and “Delete”).
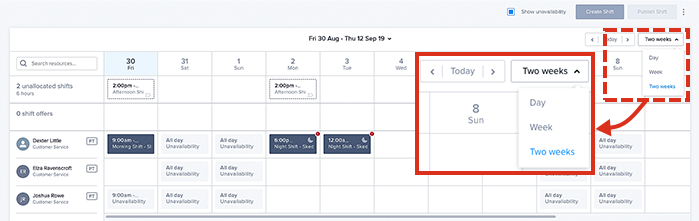
The view selector allows the scheduler to choose from the available options to increase or decrease the visible time span, i.e., view a day, a week, or two weeks of shifts. The default view is “week.”
Tip
Shifts that go past midnight have a crescent moon symbol at the top-right corner of the shift card.Note
Resources will only appear when looking at (filtering) their primary region in the shifts calendar, i.e., they will not appear in any secondary regions.View shifts in the Schedule console
Refer to Display shifts in swimlane views.
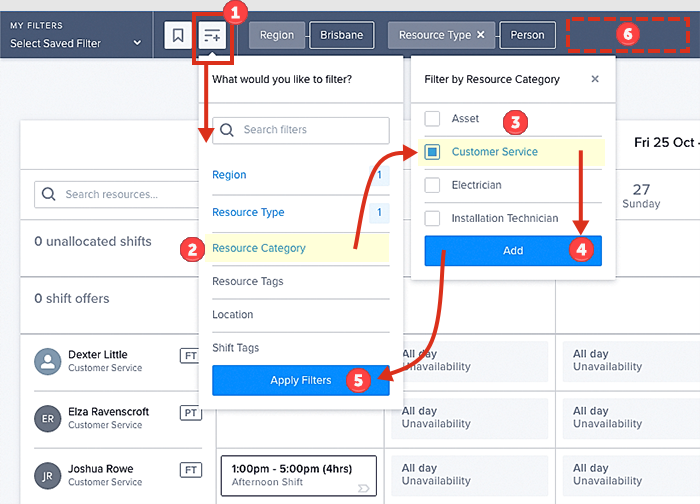
Filter shifts
Schedulers can filter their resource list to find the most suitable resources. The following filter options are available specifically for shifts:
- Region.
- Location.
- Resource Type.
- Resource Category.
- Resource Tags.
Remove a resource from a shift
To remove an allocated resource from a shift card (effectively canceling the shift for that resource), perform one of the following:
- Drag the shift card to the “Unallocated Shifts” swimlane in the shifts calendar. The shift card will be reset back to its draft state.
- Click on the shift card, and from the More options menu, select Edit. Click on the Resources tab and deselect the checkbox next to the resource’s name. Finally, click Save. The shift card will be reset back to its draft state, and it will be placed in the Unallocated Shifts swimlane.
Once back in a draft state, the shift can be reused (reinstated or repurposed) as required.
Delete shifts
To delete a single shift, right-click on the shift card in the shifts calendar. A menu will be displayed with four options: Edit, Publish, Delete, and Duplicate. Click delete to remove the shift. Once deleted, the shift card is removed from the shifts calendar, console swimlanes, and from any affected resources’ mobile agenda.
Related links
- Manage shifts
- View agenda and calendar in the Skedulo v2 mobile app.
- View agenda and calendar in the Skedulo Plus mobile app.
Resource is no longer active in CRM
When a resource is made inactive in the CRM (i.e., “Is Active” is unchecked in the resource’s profile), all future shift allocations for that resource are removed and set to “Unallocated” (Draft). The scheduler can then clearly see which shifts require rescheduling.
Feedback
Was this page helpful?