Tutorial 4 - Automatically create a job when a contact is added
Beta feature
This feature is currently in beta, and should be considered ‘under development’. Learn about the automations beta.Overview
Scenario
You work for a home care organization. When a care coordinator registers a new client as a contact record in Skedulo, your team wants a needs assessment job automatically created so it can be picked up and scheduled promptly. Not every account should trigger this behavior: vendor accounts and referral partners should not create jobs: so each account has an AccountType field that classifies what kind of account it is.
This automation handles the whole process without any manual intervention: it checks the account type, geocodes the client’s address to find the right region, and creates the job linked to the account, contact, and region.
What the automation does
In this tutorial you will create an automation that automatically creates a job whenever a new contact record is inserted. The automation will:
- Load the contact’s parent account record to read a custom field, using the Get Record action.
- Check whether the account’s AccountType is Client, using a Choice step.
- Build a single address string from the contact’s individual address fields, using a Variables step.
- Geocode the contact’s address to obtain latitude and longitude coordinates.
- Find the closest region to the geocoded coordinates.
- Create the job and link it to the account, contact, and region.
This tutorial introduces several new concepts: the Get Record action for loading a related record, the Variables step for preparing reusable values, conditional branching with the Choice step, and chaining step outputs together across multiple actions.
By the end of this tutorial you will have:
- Created an automation triggered by a contact insert, filtered to contacts that have a parent account
- Used the Get Record action to load a related Account record and make its fields available in the workflow
- Added a Choice step to conditionally branch based on the account’s AccountType picklist value
- Used a Variables step to build a reusable address string from the contact’s individual address fields
- Used the Geocode Address action to convert the address to coordinates
- Used the Find Closest Region action to identify the best region for the job
- Used the Create Job action to create a job linked to the account, contact, and region
- Tested the automation and verified the job was created
Prerequisites
- You must have the Administrator role, or a role that includes the “Modify webhooks and triggered actions” permission.
- You should be familiar with the automation builder UI. If not, read Get to know the automation builder UI first.
- Completing Tutorial 1, Tutorial 2, and Tutorial 3 first is recommended.
- The Account object must have a picklist custom field named AccountType. If this field does not yet exist, create it before proceeding, see Manage custom fields for instructions.
Configure the AccountType field with the following properties:
| Property | Value |
|---|---|
| Field name | AccountType |
| Field type | Picklist (single-select) |
| Options | Client, Referrer, Vendor, Partner |
- Client: a care recipient. Contacts linked to a Client account will have a needs assessment job created automatically.
- Referrer: a GP surgery, hospital, or social worker who refers clients to the organization. No job is created.
- Vendor: a supplier of equipment or consumables. No job is created.
- Partner: another care organization or subcontractor. No job is created.
Step 1: Create a new automation
- In the web app, navigate to Settings > Configuration tools > Automations.
- Click New automation.
- In the New automation dialog, enter a Name for the automation, for example:
Tutorial 4 - Create job for new contact - Optionally, enter a Description such as:
Automatically creates a needs assessment job when a new contact is inserted under a Client account. - Select the Record Modified template.
- Click OK to continue to the automation builder.
The automation builder opens with a default trigger step and is pre-populated with an Echo action by default.
Step 2: Configure the trigger
The trigger will fire whenever a Contact record is inserted. You will configure it to respond to Insert operations only, and add a filter that stops the automation from running when the new contact has no parent account. The account is needed later in the workflow: both to check the custom flag and to link to the new job: so there is no point proceeding without one.
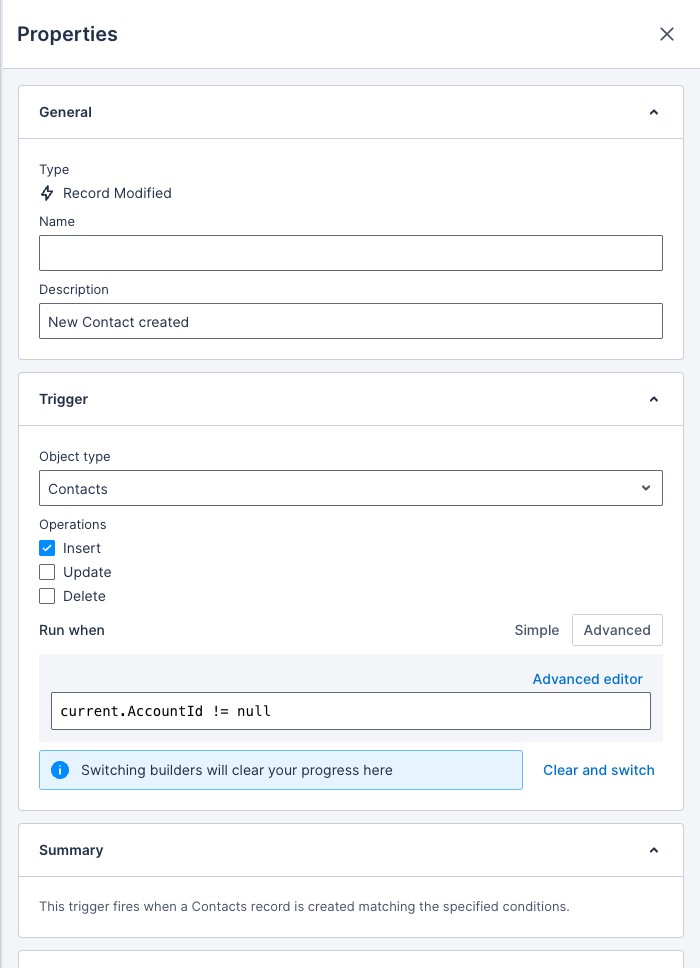
- On the workflow canvas, click the Trigger step (the blue rectangle). The step properties panel opens on the right.
- Under the Trigger section, find the Object type field and select Contacts from the dropdown.
- Under Operations, enable the Insert checkbox only. Make sure the Update and Delete checkboxes are cleared.
- Under Run when, click Advanced and enter the following EQL expression:
current.AccountId != null
This filter ensures the automation only starts for contacts that are linked to an account. Contacts without a parent account are excluded at the trigger level, before any workflow steps run.
Tip
Run when accepts EQL (Elastic Query Language) expressions in its Advanced mode. See the EQL filter documentation for details.Step 3: Replace the Echo action with a Get Record action
The template pre-populates an Echo action as a placeholder. The first real step in this workflow is to load the Account record associated with the new contact, so that you can read the AccountType custom field from it.
The trigger fires on a Contact insert and makes the Contact’s own fields available as workflow variables: but it does not automatically load the fields of related records such as the Account. The Get Record action fetches a specific record by ID and makes the fields you request available as variables for the rest of the workflow.
Remove the Echo step
- On the workflow canvas, click the Echo step to select it.
- Delete it by pressing the Delete key, clicking the trash icon in the top right corner of the step, or clicking Delete step in the step properties panel.
Add and configure the Get Record step
- In the Steps palette on the left, locate the Get Record action. Type
getin the search box to find it. - Drag the Get Record step from the palette onto the workflow canvas and drop it onto the placeholder below the trigger step.
- Click the Get Record step to open its properties.
- In the Object type field, select Accounts.
- In the Id field, enter:
$trigger.current.AccountId - In the Fields section, click + Add field and select AccountType.
The Get Record action only returns the fields you explicitly request: it does not load every field on the record. In this workflow you only need the AccountType field, so that is the only field to add here. If you need additional Account fields later in the workflow, add them now.
The output of the Get Record step is stored in the $getRecord variable. Requested fields are accessed via the path $getRecord.result.data.{fieldName}: in this case, $getRecord.result.data.AccountType.
Tip
To browse all available workflow variables, click the $ icon next to any field, or type$ directly into the field. A variable picker will appear showing all outputs from earlier steps in the workflow.
Step 4: Add and configure the Choice step
With the Account record loaded, you can now add the Choice step that branches the workflow based on whether the account is classified as a client.
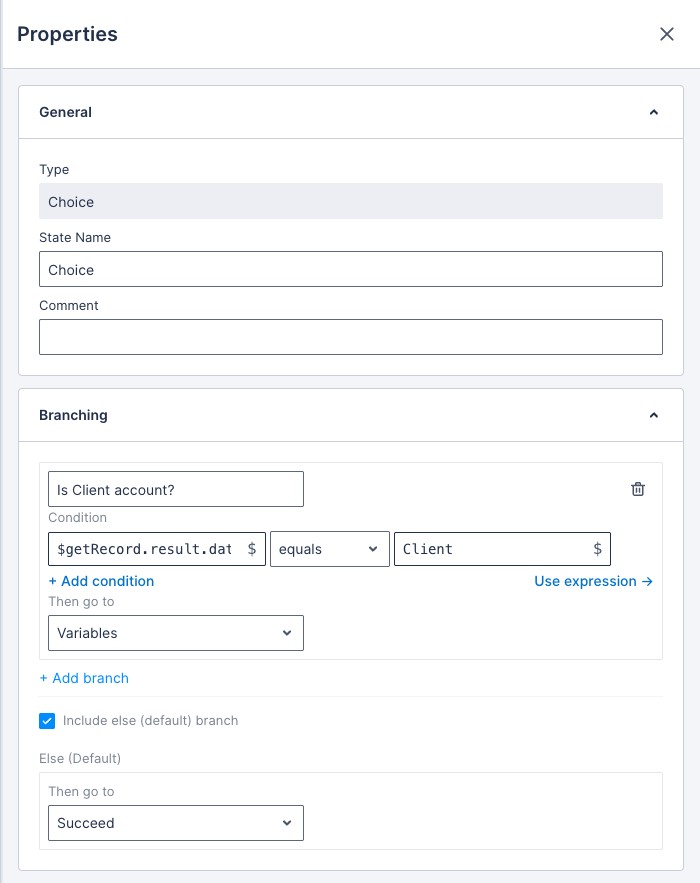
Add the step
- In the Steps palette, locate the Choice step. Type
choicein the search box to find it. - Drag the Choice step onto the canvas and drop it below the Get Record step.
Configure the step
-
Click the Choice step to open its properties. The step starts with a single branch for you to configure.
-
In the branch, set the Label (optional) field to:
Is Client -
In the Condition for that branch, click Use expression → to switch from the no-code builder to a raw expression, and enter the following JSONata expression:
$getRecord.result.data.AccountType = 'Client'This reads the AccountType field from the Account record loaded in Step 3 and checks whether its value is
Client.Note
JSONata uses=for equality comparisons, not==. See Comparisons and logic for a full list of supported operators.If the value is
Client, the workflow will follow the Is Client branch. For any other value:Referrer,Vendor,Partner, or an unset field: the workflow will follow the default branch and complete without creating a job. -
Enable Include else (default) branch, and set its Then go to to End successfully (Succeed).
Note
The Else (Default) branch is the pathway the workflow follows when the Is Client branch’s condition doesn’t match. Setting its Then go to to End successfully (Succeed) creates a new Succeed step and ends the workflow there for non-Client accounts.All remaining steps: Variables, Geocode Address, Find Closest Region, and Create Job: must be placed inside the Is Client branch.
Step 5: Add and configure a Variables step
The first step inside the Is Client branch builds the contact’s address as a single string. Rather than repeating the same concatenation expression in every step that needs it, you can define it once in a Variables step and reference the result by name for the rest of the workflow.
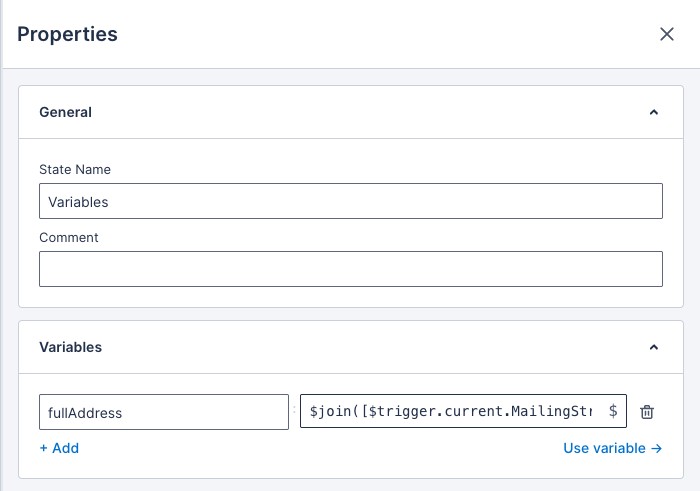
Add the step
- In the Steps palette, locate the Variables step. Type
variablesin the search box to find it. - Drag the Variables step onto the canvas and drop it into the Is Client branch placeholder inside the Choice step.
Configure the step
- Click the Variables step to open its properties.
- Click + Add to create a new variable definition row.
- In the key field, enter:
fullAddress - In the value field, enter the following expression:
$join([$trigger.current.MailingStreet, $trigger.current.MailingCity, $trigger.current.MailingState, $trigger.current.MailingPostalCode], ', ')
Step input fields in the automation builder, including variable values: support JSONata, a lightweight expression language for querying and transforming data. The $join function takes an array of values and a separator, and concatenates them into a single string. For a contact at 123 Main St, Springfield, IL 62701 the result would be:
123 Main St, Springfield, IL, 62701
Tip
JSONata is used throughout the automation builder for step input values, variable definitions, and choice conditions. It provides a rich set of built-in functions for working with strings, numbers, arrays, and dates. See JSONata expressions for a Skedulo-focused reference, or the JSONata documentation for the full language specification.Note
The field names above (MailingStreet, MailingCity, MailingState, MailingPostalCode) are the standard address field names for Contact records. Click the $ icon next to the value field and navigate to trigger > current in the variable picker to browse all available Contact fields.
The address string will be available in all subsequent steps as $fullAddress.
Step 6: Add and configure the Geocode Address action
Add the Geocode Address action inside the Is Client branch of the Choice step. This action takes the address string you prepared in the Variables step and returns the corresponding latitude and longitude coordinates.
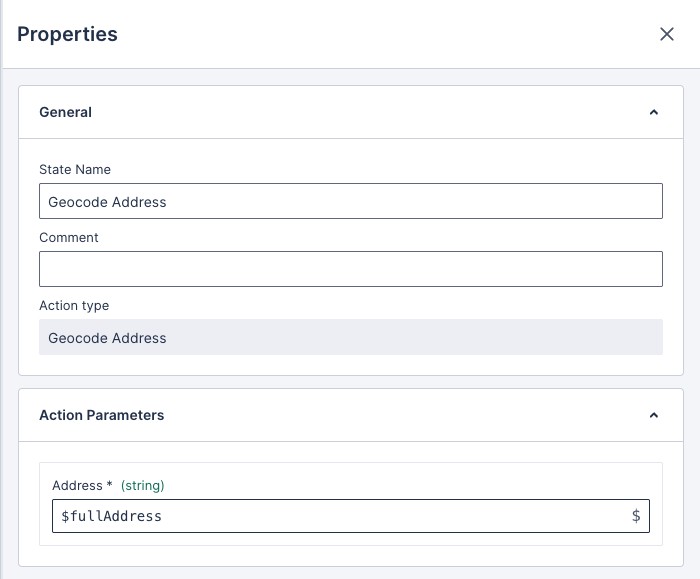
Add the step
- In the Steps palette, locate the Geocode Address action. Type
geocodein the search box to find it. - Drag the Geocode Address step onto the canvas and drop it into the Is Client branch placeholder inside the Choice step.
Configure the step
- Click the Geocode Address step to open its properties.
- In the Address field, enter:
$fullAddress
This references the address string you defined in the Variables step, rather than repeating the concatenation expression here. If you need the full address string anywhere else in the workflow, for example, to set it on the new job: you can reference $fullAddress there too.
The Geocode Address action outputs the resolved coordinates. They are available in subsequent steps as $geocodeAddress.result.data.latitude and $geocodeAddress.result.data.longitude.
Step 7: Add and configure the Find Closest Region action
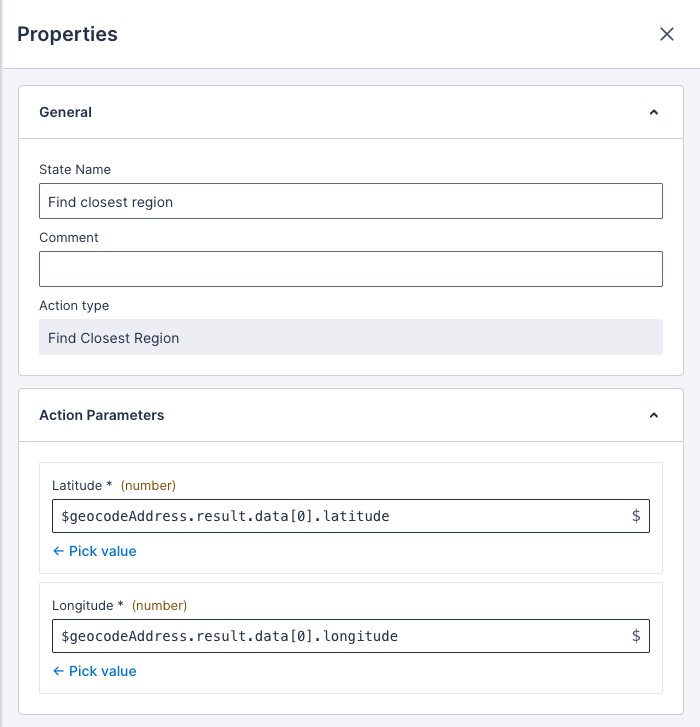
Add the Find Closest Region action immediately after the Geocode Address step, also inside the Is Client branch. This action uses the coordinates from the previous step to identify the most appropriate region for the new job.
Add the step
- In the Steps palette, locate the Find Closest Region action. Type
regionin the search box to find it. - Drag the Find Closest Region step onto the canvas and drop it below the Geocode Address step, still inside the Is Client branch.
Configure the step
- Click the Find Closest Region step to open its properties.
- In the Latitude field, enter:
$geocodeAddress.result.data.latitude - In the Longitude field, enter:
$geocodeAddress.result.data.longitude
Tip
To browse all available workflow variables, click the $ icon next to any field, or type$ directly into the field. A variable picker will appear showing all outputs from earlier steps in the workflow.
The Find Closest Region action returns the ID of the best matching region, available in the next step as $findClosestRegion.result.data.UID.
Step 8: Add and configure the Create Job action
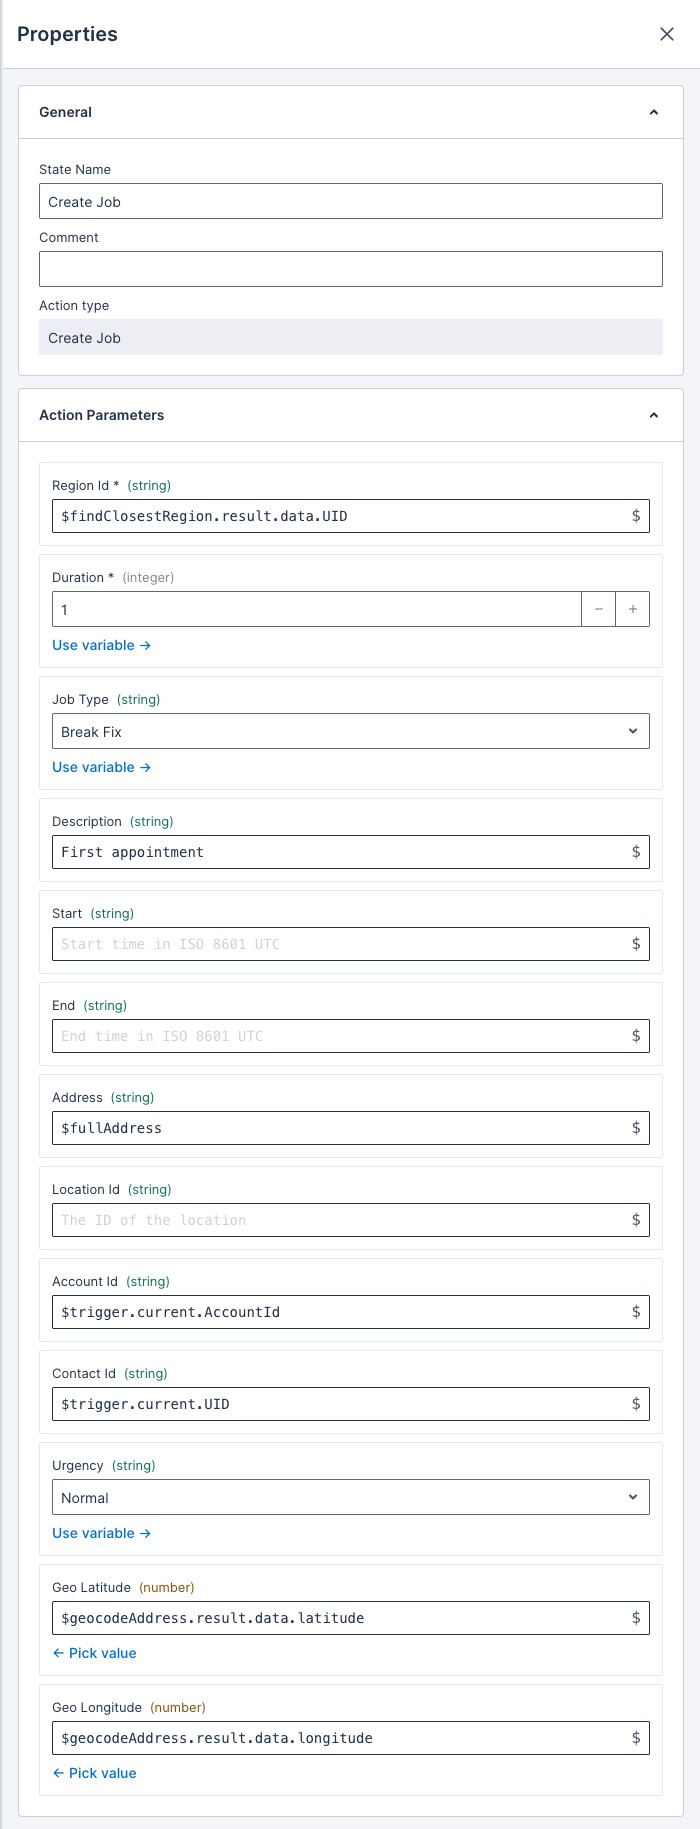
The final action in the Is Client branch is Create Job. This creates a new job record and links it to the account, contact, and region identified by the previous steps.
Add the step
- In the Steps palette, locate the Create Job action. Type
create jobin the search box to find it. - Drag the Create Job step onto the canvas and drop it below the Find Closest Region step, still inside the Is Client branch.
Configure the step
-
Click the Create Job step to open its properties.
-
In the Account Id field, enter:
$trigger.current.AccountId -
In the Contact Id field, enter:
$trigger.current.UID -
In the Region Id field, enter:
$findClosestRegion.result.data.UID -
In the Description field, enter:
'Initial needs assessment for: ' & $trigger.current.FirstName & ' ' & $trigger.current.LastNameThe
&operator concatenates strings in JSONata: here it joins the static label with the new client’s first and last name to produce something likeInitial needs assessment for: Jane Smith. See Working with strings for more string functions and patterns. -
In the Address field, enter:
$fullAddress -
In the Geo Latitude field, enter:
$geocodeAddress.result.data.latitude -
In the Geo Longitude field, enter:
$geocodeAddress.result.data.longitude -
In the Duration field, enter:
30
Setting the address and coordinates places the job on the map in the scheduling view. The duration of 30 minutes is a reasonable default for an initial needs assessment: adjust this to match your organization’s standard visit length.
Step 9: Activate the automation
- In the automation builder header, click Activate. This automation is currently a Draft: clicking Activate validates the whole workflow and makes it live in one step. If you’d rather leave it as a draft for now, click Save as Draft instead, and activate it later from the automation detail page.
- If there are any configuration errors, they will be highlighted in the builder. Resolve them and click Activate again.
- Once saved successfully, click the Close button to leave the automation builder. You will be shown the automation detail page for the automation you just created, now showing a status of Active.
The automation will fire the next time a contact with a parent account is inserted.
Step 10: Create a test contact to trigger the automation
To test the automation, create a contact with a complete address, linked to an account that has AccountType set to Client.
Prepare the test account
Before creating the contact, confirm that the account you plan to use has AccountType set to Client. If you are unsure how to set a custom field on an account record, refer to Manage custom fields.
Create the test contact
- Use the Quick create button in the main navigation bar at the top of the page. It’s the white button with the + plus sign in it.
- Click + Contact in the menu.
- On the contact create page, fill in the required fields and enter a complete address, including Street, City, State, Postal Code, and Country.
- In the Account field, link the contact to the account you prepared above.
- Save the contact.
Creating the contact fires an Insert operation on the Contacts object. Because the contact has a parent account (AccountId != null), the trigger filter matches and the workflow starts. The workflow loads the account, builds the address string, evaluates the AccountType field, and: since it is Client: proceeds to geocode the address, find the closest region, and create a job.
Step 11: Verify the job was created
First confirm the automation ran by checking the activity log, then verify that a job was created and linked correctly.
Check the activity log
After creating the contact, navigate to Settings > Configuration tools > Automations and click the name of the Tutorial 4 - Create job for new contact entry.
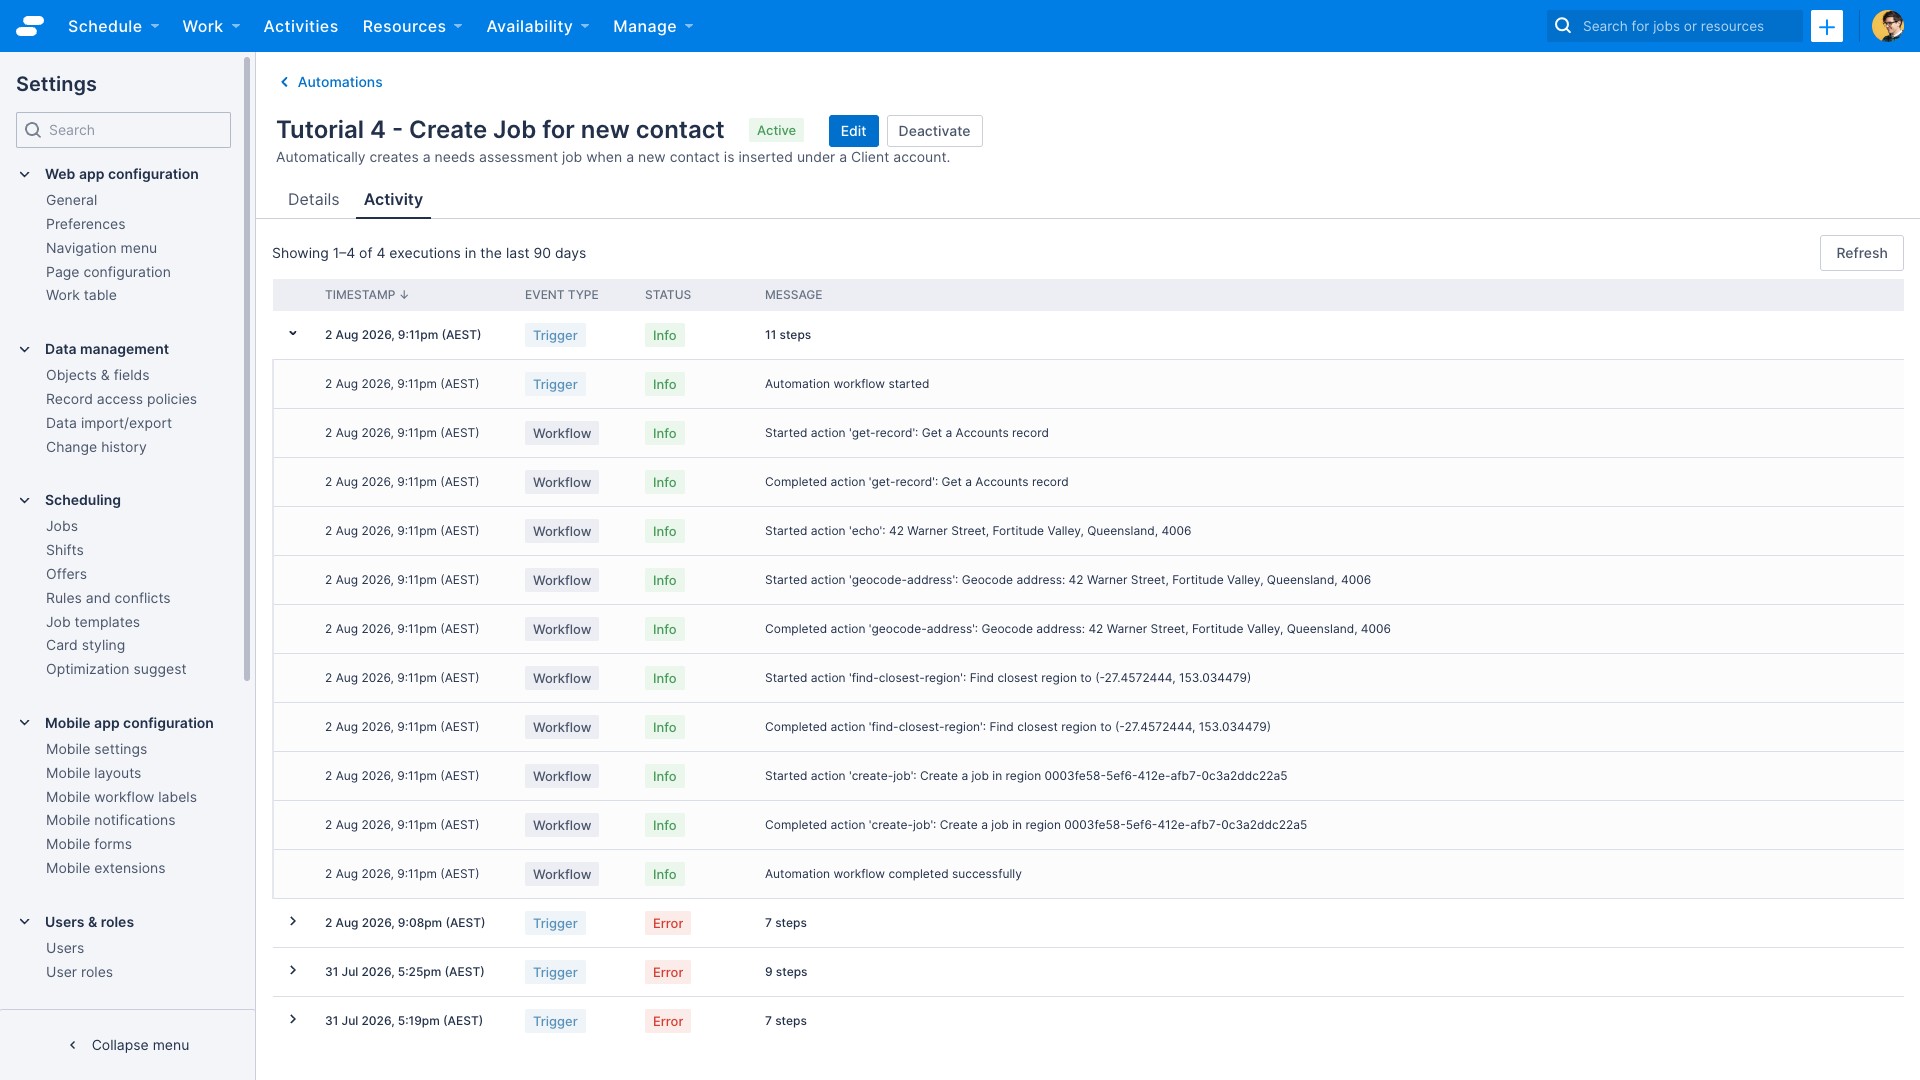
- Click the Activity tab.
- Each row represents one workflow execution. Click the most recent (topmost) row to expand it and see the individual step messages for that run.
You should see entries similar to:
| Timestamp | Status | Message | |
|---|---|---|---|
| {date/time} | Trigger | Info | Automation workflow started |
| {date/time} | Workflow | Info | Started action ‘get-record’: Get a Accounts record |
| {date/time} | Workflow | Info | Completed action ‘get-record’: Get a Accounts record |
| {date/time} | Workflow | Info | Started action ‘geocode-address’: Geocode address: 123 Main St, Springfield, IL, 62701 |
| {date/time} | Workflow | Info | Completed action ‘geocode-address’: Geocode address: 123 Main St, Springfield, IL, 62701 |
| {date/time} | Workflow | Info | Started action ‘find-closest-region’: Find closest region to (39.7817, -89.6501) |
| {date/time} | Workflow | Info | Completed action ‘find-closest-region’: Find closest region to (39.7817, -89.6501) |
| {date/time} | Workflow | Info | Started action ‘create-job’: Create a job in region {region-id} |
| {date/time} | Workflow | Info | Completed action ‘create-job’: Create a job in region {region-id} |
| {date/time} | Workflow | Info | Automation workflow completed successfully |
Note the entries within an expanded execution are ordered oldest to newest, showing the order the steps actually ran in.
Note
Activity logs may take a few seconds to appear. If the log is empty, wait a moment and click the refresh button in the top right of the list.Verify the job record
- Navigate to the Jobs list and locate the job that was just created.
- Open the job and confirm that:
- The Account field is linked to the account you used for the test.
- The Contact field is linked to the contact you just created.
- The Region field is populated with the region returned by the Find Closest Region action.
- The Description field shows the client’s name.
- The job is placed on the map at the contact’s address.
You should be able to see from the log and the job record that:
- The trigger detected the new contact and confirmed it had a parent account
- The Get Record action loaded the parent Account’s AccountType field
- The Choice step evaluated AccountType, found
Client, and followed the Is Client branch - The Variables step built the address string from the contact’s address fields
- The Geocode Address action resolved the address to coordinates
- The Find Closest Region action identified an appropriate region from those coordinates
- The Create Job action created a new job linked to the account, contact, and region
- The workflow completed successfully
What you learned
In this tutorial you:
- Configured a trigger filter to exclude contacts that have no parent account
- Used the Get Record action to load a related Account record and make its fields available in the workflow
- Used a Variables step to define a reusable address string, avoiding repeated expressions across multiple steps
- Used a Choice step to conditionally branch the workflow based on a picklist field value
- Used the Geocode Address action to convert an address string to coordinates
- Used the Find Closest Region action to identify an appropriate region from coordinates
- Used the Create Job action to create a job linked to an account, contact, and region
- Chained step outputs together across multiple sequential actions
Next steps
- Experiment with the Else branch of the Choice step, for example, add an Echo action to log a message when a contact is inserted for a non-Client account.
- Explore the full list of available actions in the Action reference guide.
Feedback
Was this page helpful?