Develop a function
Overview
The Skedulo CLI has built-in support for generating and locally debugging a function. For information about the CLI, please see the CLI documentation.
For information on the CLI commands for working with functions, please see the sked function dev and sked function generate command reference documentation.
Prerequisites
- The Skedulo CLI is installed
- Your environment is set up
- You are logged into a tenant (team)
Create a new function
To create a new function, do the following steps:
-
Open a new terminal and navigate to a directory where you want your source code to reside.
-
Run the following command:
sked function generate --name my-first-function --outputdir .
Note
All commands in the Skedulo CLI support the--help flag to learn more about how that command works. For example, use: sked function generate --help to get more information about the sked function generate command.
Source code
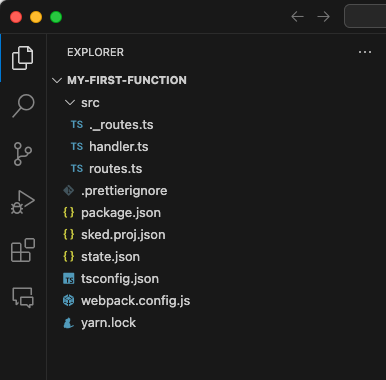
The generate command creates a new directory with the name of the function. If we open this directory in our preferred IDE (VS Code), we can see the folders and files that are generated.
To open the source code in VS Code, do the following steps:
- In your terminal window, run the command:
code ./my-first-function

Most of what you see are common to Node.js rest API applications written in TypeScript. There are a couple of files specific to Skedulo:
| Filename | Description |
|---|---|
| state.json | This file contains the metadata that represents the function to the CLI artifact and packaging commands. |
| sked.proj.json | This file contains the specific configuration of the function, including its runtime and any settings. |
Change the description
The default description is not very useful, but can be updated to better reflect what the function is for.
To update the function’s description, do the following steps:
- In VS Code, open the sked.proj.json file.
- Change the description property to your preferred value.
- Save the file.
Your sked.proj.json should look something like this:
{
  "type": "function",
  "version": "2",
  "name": "my-first-function",
  "description": "Description of the function",
  "runtime": "nodejs18.x",
  "settings": {}
}
Compile the function
The function template includes a couple of custom scripts. Before you try to run the code, do the following:
-
In the terminal, change directory using:
cd ./my-first-function -
Install dependencies by running:
yarn bootstrap -
Compile the code by running:
yarn compile
Run the function
To test the function locally, you can use the built-in development server by doing the following steps:
-
Open a new terminal window to run our local development server.
-
Change directory to the location of your function.
-
Start the development server by running:
sked function dev . -p 3000
The sked function dev command takes two parameters: the directory of the function to run; and the port on which to host the server.
Test the function
To test the function do the following:
- In the original terminal window, use curl (or a similar tool) to make the following request:
curl --location 'http://127.0.0.1:3000/ping' --header 'Authorization: Bearer <Your Tenant API Token>' - You should get the following result from the template:
{"result":"pong","apiServer":"https://api.skedulo.com"}
Note
Remember to replace the placeholder text in this example with your own API token!Make changes to the function
The generated function template doesn’t do very much, so you’ll want to modify it to meet your needs.
To modify your function, do the following steps:
-
In VS Code, make your changes to the source code as required.
-
Compile your code using:
yarn compile. Your change will automatically be reflected in the local development server. -
Test the function to check that it still works.
Deploy the function to your tenant
Now that you’ve got a working function, the next thing you’ll want to do is to deploy it to your tenant. There are two ways to do this, as described in the following sections.
Upsert the function using the artifact command
You can use the artifact commands to manipulate individual artifacts. It is a finer level of control compared to the package deploy command.
To upsert your function to your tenant, run this command in your terminal:
sked artifacts function upsert -f state.json
Deploy the function using the package deploy command
If you’re developing a solution with multiple components, you may want to use the package deploy command. This can be used to deploy any artifacts within a directory.
To deploy a package to your tenant, run this command in your terminal:
sked package deploy -p .
Test the deployed function
To make sure your function is working as expected, do the following steps:
- Get the base URL of the function you deployed by doing the following:
- Execute the list command:
sked artifacts function list - Locate your function in the list.
- Copy the baseUrl column.
- Execute the list command:
- Use curl to test your function by running:
curl --location '<Your baseUrl>/ping' --header 'Authorization: Bearer <Your Tenant API Token>'
Feedback
Was this page helpful?